Fruity Pebbles Cheesecake Tacos-Sweet Treat
Fruity Pebbles Cheesecake Tacos are about to become your new favorite dessert obsession! Seriously, if you’ve ever dreamed of combining the creamy, dreamy indulgence of cheesecake with the fun, colorful crunch of your childhood cereal, then prepare for pure bliss. We’re talking about taking that iconic tang of cream cheese, swirling it with sweet, vibrant Fruity Pebbles, and then… well, the magic really happens when we encase this delightful filling in a crispy, taco-shaped shell, itself dusted with more of that magical cereal. It’s a textural wonderland and a flavor explosion all in one bite. People adore these Fruity Pebbles Cheesecake Tacos because they tap into that nostalgic joy while delivering an unexpectedly sophisticated yet utterly playful dessert experience. What makes them truly special is the brilliant fusion of familiar comfort food elements with a whimsical, dessert-forward twist that’s guaranteed to bring smiles and second helpings.
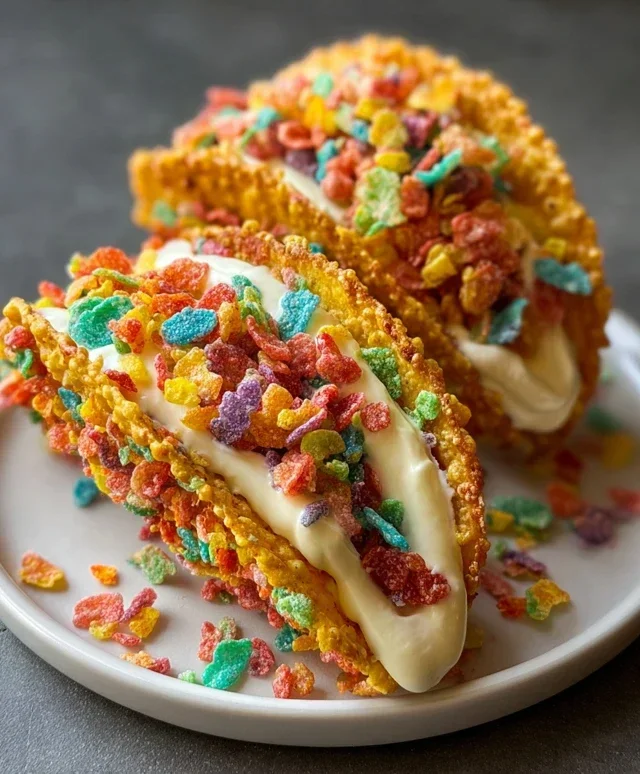
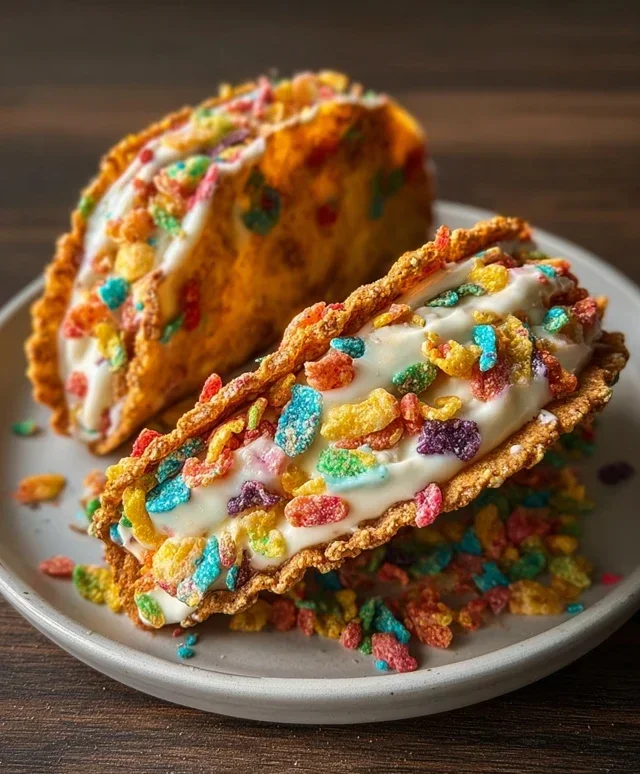
Fruity Pebbles Cheesecake Tacos
Get ready for a dessert experience that’s as fun to make as it is to eat! We’re transforming the classic cereal into a vibrant, no-bake cheesecake filling nestled inside a crunchy, cereal-infused shell. These Fruity Pebbles Cheesecake Tacos are a burst of color and flavor, perfect for parties, a special treat, or just because. The sweet crunch of the cereal shell combined with the creamy, tangy cheesecake filling and a cloud of whipped cream is a match made in dessert heaven. Forget boring old desserts; these tacos are a playful explosion of joy!
Ingredients:
Instructions:
Preparing the Taco Shells
The first step to our delightful creation is crafting the edible taco shells. This is where the magic begin extracts! In a medium-sized bowl, combine 2 cups of the colorful fruity cereal with the melted unsalted butter. Stir gently until all the cereal pieces are coated in the butter. This coating is essential for helping the cereal bind together and become firm. Next, you’ll want to prepare a muffin tin. You can lightly grease it if you’re concerned about sticking, but often the butter in the mixture is enough. Using the back of a spoon or your fingers (lightly greased if needed), press the cereal mixture into the bottom and up the sides of each muffin cup, forming a taco shell shape. Try to make them relatively even in thickness for consistent baking. It’s important to press firmly to ensure they hold their shape. Once molded, place the muffin tin in the refrigerator for at least 30 minutes to allow the shells to set and harden. This chilling time is crucial for them to become sturdy enough to hold our delicious cheesecake filling.
Crafting the Fruity Cheesecake Filling
While our taco shells are getting nice and firm in the fridge, we can whip up the creamy, dreamy cheesecake filling. In a separate medium bowl, ensure your cream cheese is truly softened. This is key for achieving a smooth, lump-free filling. If it’s not soft enough, you can gently microwave it for a few seconds, being careful not to melt it. Add the softened cream cheese, sifted powdered sugar, and pure vanilla extract to the bowl. Sifting the powdered sugar is an important step as it prevents any potential lumps from forming in your cheesecake mixture, ensuring a velvety texture. Beat these ingredients together using an electric mixer (or a whisk if you’re feeling strong!) until the mixture is completely smooth and creamy, with no traces of cream cheese or powdered sugar lumps. This should take a couple of minutes. Once smooth, gently fold in the 1 cup of whipped cream. Be delicate with this step; we want to incorporate the whipped cream without deflating it too much, as this will give our cheesecake filling a light and airy consistency. The goal is a homogenous, creamy mixture that’s ready to be spooned into our prepared shells.
Assembling the Fruity Pebbles Cheesecake Tacos
Now for the fun part – assembly! Carefully remove the hardened cereal taco shells from the muffin tin. You might need to gently run a knife around the edges if they seem a bit stuck, but they should pop out fairly easily. Place the shells on a serving platter or individual plates. Spoon the prepared cheesecake filling generously into each cereal taco shell. Don’t be shy; fill them up! Aim to get a good amount of that creamy goodness into every shell. You can use a spoon or a piping bag for a neater presentation, but a spoon is perfectly fine for a more rustic, homemade feel. Ensure the filling is distributed evenly, reaching the edges of the shell.
The Final Flourish: Garnish and Chill
To elevate these already fantastic tacos, we’re going to add the final touches. Take your additional colorful fruity cereal and sprinkle it generously over the top of the cheesecake filling in each taco. This not only adds a wonderful visual appeal, making them even more vibrant, but also reinforces that delicious fruity flavor and adds a delightful crunch. You can also add a dollop of extra whipped cream on top before sprinkling the cereal if you like an extra cloud of sweetness. Once assembled and garnished, place the Fruity Pebbles Cheesecake Tacos back into the refrigerator for at least another 30 minutes. This final chilling period is essential for allowing the cheesecake filling to set up properly and for the flavors to meld together. It ensures that when you take a bite, the filling is perfectly firm and the taco holds its shape.
Serving Your Masterpiece
After the chilling time, your Fruity Pebbles Cheesecake Tacos are ready to be devoured! These are best served chilled. Arrange them on a platter and watch as they disappear quickly. They are a fantastic dessert for a birthday party, a potluck, or simply for a fun weekend treat. The combination of the crunchy, buttery cereal shell, the smooth and tangy cheesecake, and the sweet fruity cereal topping is incredibly satisfying. Enjoy the burst of colors and flavors with every bite. These tacos are sure to bring smiles to everyone who tries them!
Conclusion:
And there you have it – your very own Fruity Pebbles Cheesecake Tacos! I hope you’ve enjoyed this delightful journey into creating a dessert that’s as fun to make as it is to eat. The beauty of these tacos lies in their perfect balance of creamy, tangy cheesecake filling nestled within a crisp, sweet shell, all elevated by the vibrant crunch and nostalgic flavor of Fruity Pebbles. They’re a guaranteed crowd-pleaser, bringin extractg smiles to faces of all ages. I truly encourage you to give this recipe a try; it’s a fantastic way to add a playful twist to your dessert repertoire.
For serving, I love to present them on a platter sprinkled with a few extra Fruity Pebbles for visual appeal. They’re wonderful on their own, but also pair beautifully with a drizzle of white chocolate or a dollop of whipped cream. If you’re feeling adventurous with variations, consider adding a swirl of berry puree to the cheesecake filling or even incorporating a different colorful cereal for a unique flavor profile. The possibilities are endless, and the result is always a showstopper. Get creative and have fun with it!
Frequently Asked Questions:
Can I make the taco shells ahead of time?
Absolutely! You can prepare the taco shells a day in advance and store them in an airtight container at room temperature. Just be sure they are completely cooled before storing to maintain their crispness.
What if I don’t have Fruity Pebbles?
While Fruity Pebbles offer a signature taste, you can certainly experiment with other colorful, sweet cereals! Consider options like Cinnamon Toast Crunch for a warm spice note, or a mixed berry cereal for a different fruity flavor. The key is to find something that complements the creamy cheesecake filling.
How should I store leftover cheesecake tacos?
Leftover Fruity Pebbles Cheesecake Tacos are best stored in the refrigerator. Place them in an airtight container, and they should keep well for 2-3 days. It’s advisable to enjoy them within this timeframe for optimal texture and flavor.
Fruity Pebbles Cheesecake Tacos
A fun and colorful dessert featuring a crunchy cereal shell filled with creamy no-bake cheesecake and topped with whipped cream and more cereal.
Ingredients
-
3 cups colorful fruity cereal
-
1/2 cup unsalted butter, melted
-
8 oz cream cheese, softened
-
1/2 cup powdered sugar, sifted
-
1 tsp pure vanilla extract
-
1 cup whipped cream
-
Additional fruity cereal for garnish
Instructions
-
Step 1
In a bowl, combine 2 cups of the fruity cereal with the melted butter. Stir until well combined. -
Step 2
Press the cereal mixture into taco-shaped molds or onto the back of muffin tins to form taco shells. Chill in the refrigerator for at least 15 minutes until firm. -
Step 3
In a separate bowl, beat the softened cream cheese until smooth. Gradually beat in the sifted powdered sugar and vanilla extract until well combined. -
Step 4
Gently fold in the whipped cream into the cream cheese mixture until just combined. -
Step 5
Spoon the cheesecake filling into the chilled cereal taco shells. -
Step 6
Top each taco with additional whipped cream and a sprinkle of the remaining fruity cereal for garnish.
Important Information
Nutrition Facts (Per Serving)
It is important to consider this information as approximate and not to use it as definitive health advice.
Allergy Information
Please check ingredients for potential allergens and consult a health professional if in doubt.