Easter Bunny Chick Cupcakes-Easy Festive Treats
Easter Bunny and Chick Cupcakes are not just a treat; they’re a centerpiece of springtime joy and a delicious embodiment of the season’s most beloved symbols. Imagin extracte the delight on children’s faces as they discover these adorable creations, each one a tiny edible masterpiece. These cupcakes are universally loved because they perfectly blend whimsical design with comforting, classic flavors. What truly makes our Easter Bunny and Chick Cupcakes special is the effortless charm they bring to any celebration. Whether you’re hosting an Easter brunch, looking for a fun family baking activity, or simply want to spread a little extra cheer, these cupcakes are guaranteed to be a hit. They are surprisingly simple to make, allowing even novice bakers to achieve impressive results that will wow your guests and make your Easter gathering unforgettable. Get ready to create something truly magical!
Ingredients:
- 1 recipe Vanilla Cupcakes (or your favorite cake mix)
- 1 recipe Fluffy Vanilla Frosting (or store-bought frosting)
- Yellow and white sprinkles
- Large and mini marshmallows
- Pink colored sanding sugar
- Black decorator icing
- Jelly beans (pink for bunny noses)
- Orange colored gum or M&Ms (for chick beaks)
- Yellow food coloring (for chick frosting)
Baking the Cupcakes
The foundation of our adorable Easter Bunny and Chick Cupcakes starts with the cupcakes themselves. You can either whip up your favorite homemade vanilla cupcake recipe or opt for a convenient store-bought cake mix. If you’re using a mix, follow the package instructions carefully, paying attention to the recommended oven temperature and baking time. For homemade cupcakes, ensure all your ingredients are at room temperature for optimal texture. Cream the butter and sugar until light and fluffy, then incorporate the eggs one at a time, followed by the vanilla extract. In a separate bowl, whisk together the dry ingredients – flour, baking powder, and salt. Gradually add the dry ingredients to the wet ingredients, alternating with any liquid component (like milk or buttermilk), mixing just until combined. Be careful not to overmix, as this can lead to tough cupcakes.
Once your batter is ready, divide it evenly among your prepared cupcake liners in a muffin tin. A good rule of thumb is to fill each liner about two-thirds full to allow for a nice rise without overflowing. Bake according to your recipe’s instructions, or until a toothpick inserted into the center of a cupcake comes out clean. The aroma of freshly baked vanilla cupcakes is one of the best! Allow the cupcakes to cool in the muffin tin for about 5-10 minutes before transferring them to a wire rack to cool completely. This cooling step is crucial; attempting to frost warm cupcakes will result in a melty, sad mess. Patience here is key to successful decorating!
Preparing the Frosting
While your cupcakes are cooling, it’s time to prepare the frosting that will bring our little critters to life. If you’re making a fluffy vanilla frosting from scratch, gather your ingredients. Typically, this involves softened butter, powdered sugar, vanilla extract, and a bit of milk or cream. Cream the softened butter until it’s smooth and creamy. Gradually add the powdered sugar, a cup at a time, mixing on low speed until it’s incorporated. Once all the sugar is added, increase the speed to medium-high and beat until the frosting is light and fluffy. Add the vanilla extract and a tablespoon or two of milk or cream until you reach your desired consistency – it should be spreadable but not runny.
If you’re using store-bought frosting, you’ll still want to divide it into two portions. One portion will be for the bunny cupcakes, and the other will be for the chick cupcakes. For the chick cupcakes, we’ll need to add a touch of yellow. Take about half of your frosting and add a few drops of yellow food coloring. Start with a little, as it’s easier to add more color than to take it away. Mix thoroughly until you achieve a vibrant, cheerful yellow hue. If you want a deeper yellow, add more coloring gradually. The remaining frosting will remain white for the bunny’s fur.
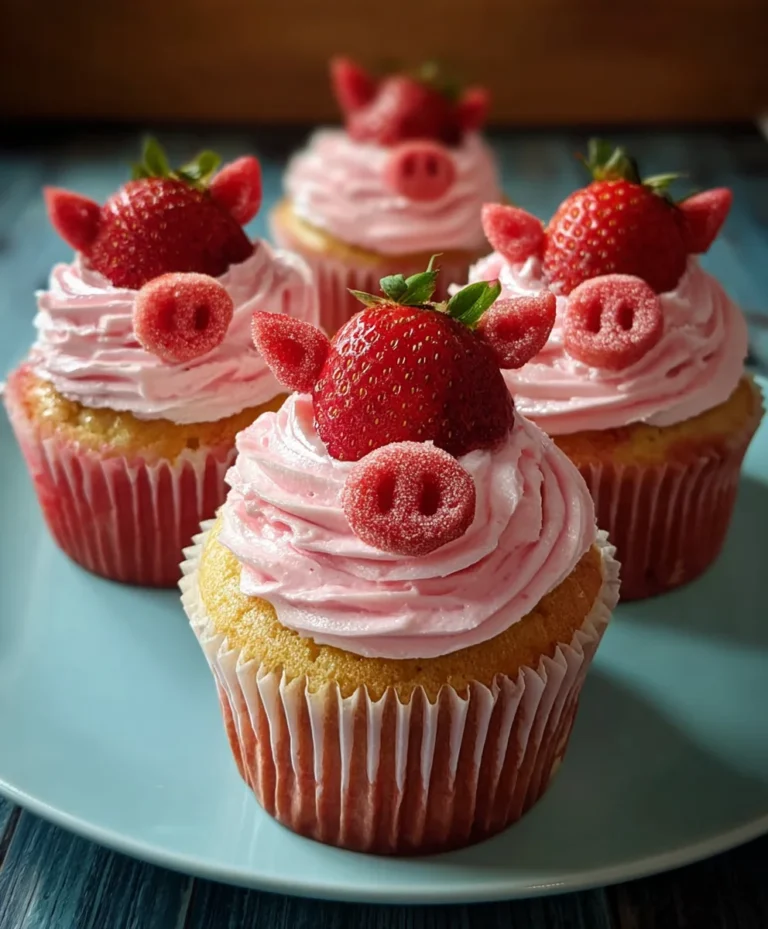
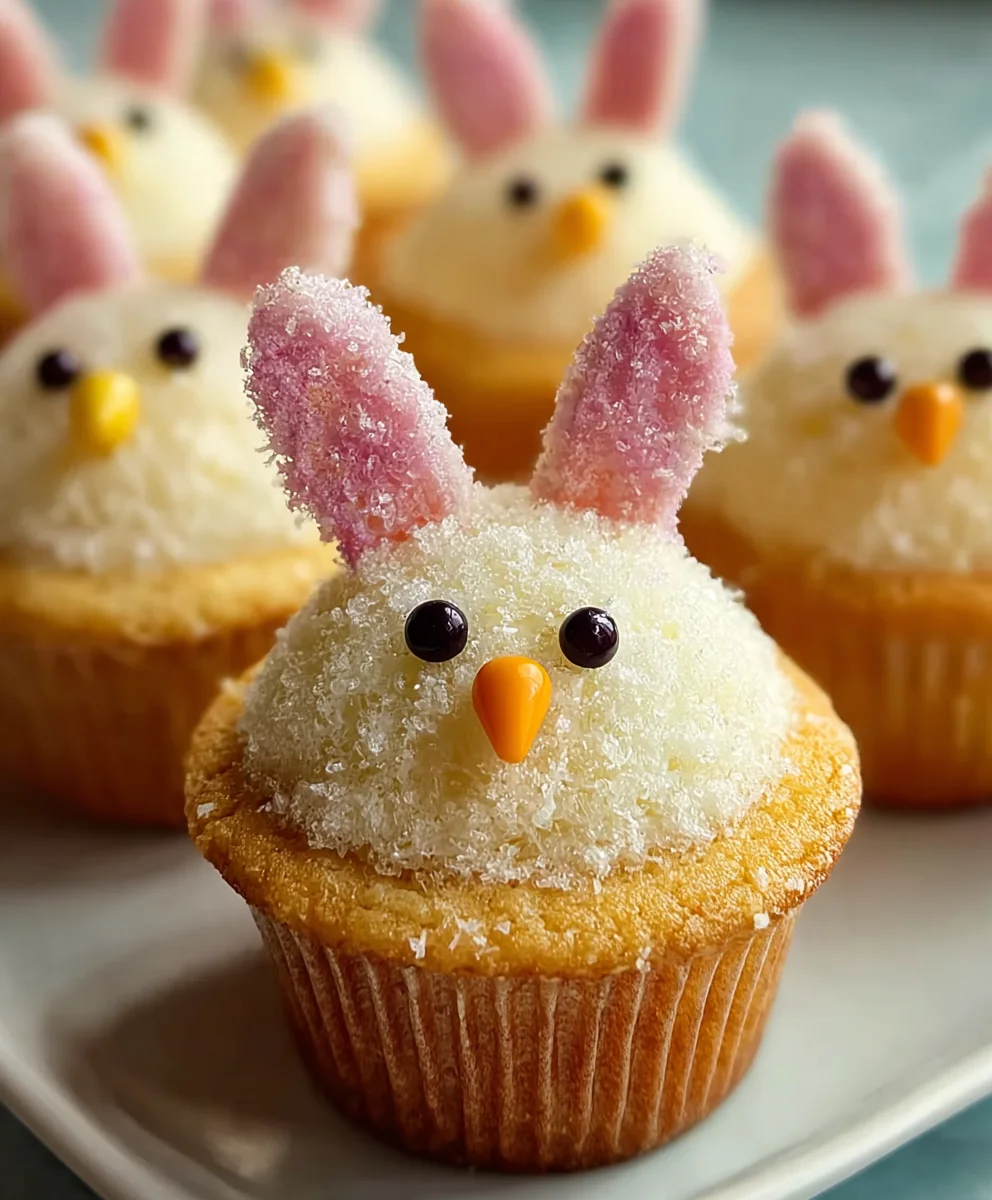
Creating the Easter Bunnies
Now for the fun part – transforming these cupcakes into adorable Easter bunnies! Start with the white frosting. You’ll want to frost the tops of your cooled cupcakes generously, creating a fluffy, cloud-like base for the bunny’s fur. Use an offset spatula or a knife to spread the frosting evenly. For the bunny ears, take two mini marshmallows for each cupcake. Dip one side of each mini marshmallow into the white frosting. Then, gently press the frosted side onto the top edge of the cupcake, creating two upright ears. You might want to position them slightly angled to give your bunny a bit of personality.
Next, we’ll add the finishing touches for our bunny faces. For the eyes, use your black decorator icing. With a fine tip or a steady hand, pipe two small dots for the eyes on the frosted surface. Then, for the nose, take a pink jelly bean and press it gently into the frosting below the eyes. The pink jelly bean instantly gives our bunny a sweet, rosy nose. For a touch of sparkle and to really make those bunny noses pop, lightly dust the jelly bean nose with a tiny bit of pink colored sanding sugar. This adds a subtle shimmer and makes them look extra special.
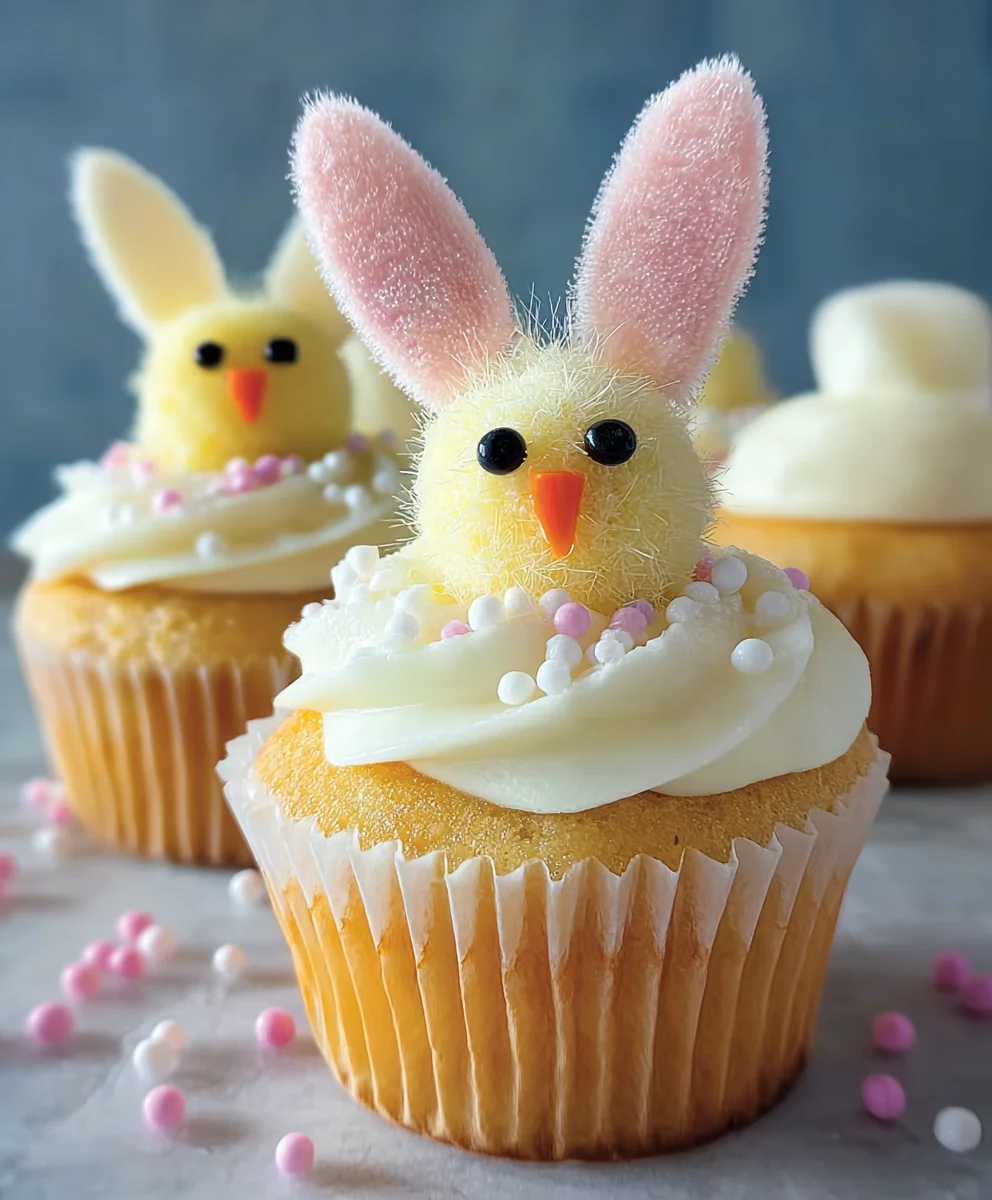
Crafting the Cheerful Chicks
It’s time to bring on the sunshine with our cheerful chick cupcakes! Take the portion of frosting that you colored yellow. Frost the tops of your cooled cupcakes with this sunny yellow frosting, again aiming for a fluffy, textured look to mimic feathers. Just like with the bunnies, you can use an offset spatula or a knife to spread the frosting smoothly or create little peaks for texture. For the chick’s beak, we’ll use our orange colored gum or M&Ms. Carefully place one piece of orange gum or an M&M in the center of the frosted top, just below where the eyes would be. This vibrant orange is the perfect beak color.
For the chick’s eyes, use your black decorator icing. Pipe two small, distinct dots above the beak. You can make them round or slightly elongated, depending on the expression you want to convey. To add a bit of extra flair and to really enhance the Easter theme, sprinkle some yellow and white sprinkles around the base of the chick or lightly over the top of the frosting. This adds a festive shimmer and a playful touch. You can also add a few sprinkles around the bunny cupcakes for a cohesive look across your Easter dessert spread.
Adding Extra Decorations and Variations
Once your bunny and chick cupcakes are assembled, take a step back and admire your handiwork! These cupcakes are already bursting with Easter charm, but you can always add a few extra touches if you wish. For example, you could use a small amount of black decorator icing to pipe tiny little feet on the bottom edge of the bunny cupcakes. For the chick cupcakes, you could use a toothpick dipped in black icing to add a tiny little mouth line below the beak. If you have extra jelly beans, you could strategically place them around the base of the cupcakes for a colorful presentation.
Consider using different colored jelly beans for bunny noses for a variety of looks. For a different chick beak, you could cut small triangles from orange fruit leather. If you’re feeling particularly artistic, you could even use your yellow frosting to pipe little tufts of hair on top of the bunny heads. Remember to have fun with it! The beauty of these Easter Bunny and Chick Cupcakes is their simplicity and the joy they bring. They are perfect for a family gathering, a classroom treat, or just a fun activity to do with children. Enjoy your delightful creations!
Conclusion:
And there you have it! Your very own batch of adorable and delicious Easter Bunny and Chick Cupcakes is ready to dazzle your guests and delight your taste buds. We’ve walked through creating the fluffy vanilla cupcakes, the creamy vanilla buttercream, and the charming decorations that bring these Easter icons to life. These cupcakes are more than just a dessert; they’re a centerpiece, a conversation starter, and a symbol of spring and celebration. Don’t be afraid to get creative with your designs and enjoy the process – the joy in making them is as sweet as the final product!
For serving suggestions, these Easter Bunny and Chick Cupcakes are perfect for any Easter brunch, a classroom party, or simply as a delightful treat to share with loved ones. They stand beautifully on a tiered cake stand or arranged artfully on a platter. For variations, consider using different cupcake flavors like lemon or strawberry, or experiment with chocolate buttercream for a richer taste. You could also add sprinkles to the batter for a hidden surprise inside each cupcake!
Frequently Asked Questions:
Q1: Can I make these Easter Bunny and Chick Cupcakes ahead of time?
Yes, you absolutely can! The cupcakes can be baked up to two days in advance and stored in an airtight container at room temperature. The buttercream can also be made a day ahead and stored in the refrigerator. Just bring it back to room temperature and whip it again before frosting. Decorating is best done the day of or the day before your event for maximum freshness and visual appeal.
Q2: What if I’m not good at decorating? Are there easier ways to make these cupcakes look cute?
Absolutely! Don’t stress about perfect piping. For the bunnies, simple piped ears and a dab of pink for the nose can be charming enough. For the chicks, a few strategically placed sprinkles can create feather textures. You can also use edible googly eyes or small candy pieces for the faces. Even simple swirls of frosting with a few sprinkles can make for a festive Easter cupcake!
Easter Bunny Chick Cupcakes-Easy Festive Treats
Adorable and easy-to-make Easter bunny and chick cupcakes perfect for festive celebrations.
Ingredients
-
1 recipe Vanilla Cupcakes (or your favorite cake mix)
-
1 recipe Fluffy Vanilla Frosting (or store-bought frosting)
-
Yellow and white sprinkles
-
Large and mini marshmallows
-
Pink colored sanding sugar
-
Black decorator icing
-
Jelly beans (pink for bunny noses)
-
Orange colored gum or M&Ms (for chick beaks)
-
Yellow food coloring (for chick frosting)
Instructions
-
Step 1
Prepare your cupcakes using your favorite vanilla cupcake recipe or a cake mix, following package or recipe instructions. Bake and allow to cool completely on a wire rack. -
Step 2
Prepare your frosting. If using store-bought, divide it into two portions. Color one portion yellow with yellow food coloring for the chick cupcakes, and leave the other portion white for the bunny cupcakes. -
Step 3
For the bunnies: Frost cooled cupcakes with white frosting. Dip mini marshmallows in frosting and attach two per cupcake for ears. Use black decorator icing for eyes and a pink jelly bean for the nose, dusted with pink sanding sugar. -
Step 4
For the chicks: Frost cooled cupcakes with yellow frosting. Place an orange gum or M&M for the beak and use black decorator icing for the eyes. -
Step 5
Add yellow and white sprinkles around the chick cupcakes or bunny cupcakes for extra festive flair. Consider adding small details like piped feet for bunnies or a tiny mouth for chicks.
Important Information
Nutrition Facts (Per Serving)
It is important to consider this information as approximate and not to use it as definitive health advice.
Allergy Information
Please check ingredients for potential allergens and consult a health professional if in doubt.