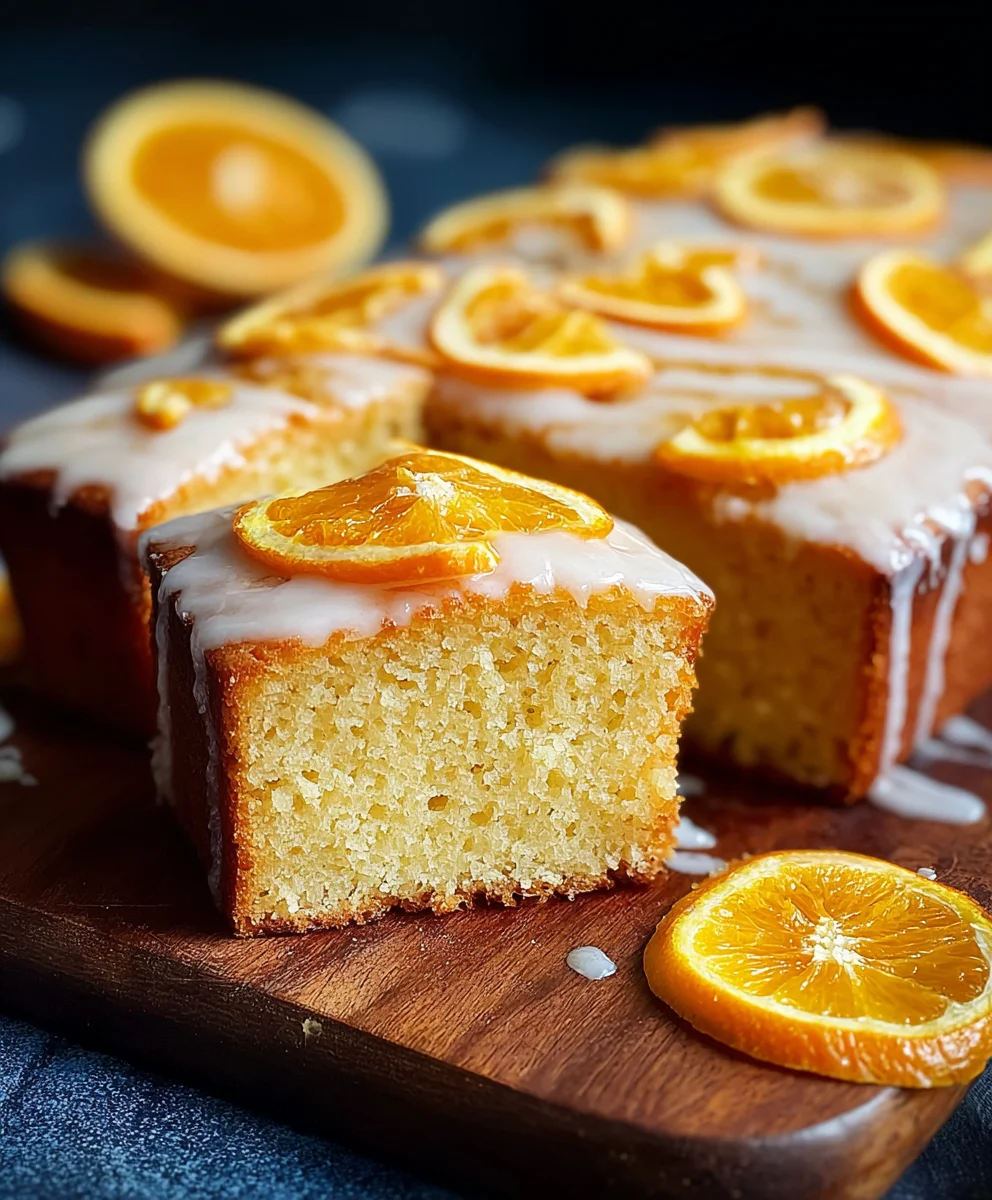
Easy Orange Drizzle Traybake Cake Recipe – So Moist
Orange Drizzle Traybake Cake is more than just a dessert; it’s a ray of sunshine baked into a comforting, crowd-pleasing treat. If you’re searching for that perfect cake that’s easy to make, incredibly moist, and bursting with zesty citrus flavor, your search ends here. This beloved classic holds a special place in many hearts because of its unparalleled simplicity and utterly delightful taste. It’s the kind of cake that graces weekend brunches, afternoon tea gatherings, and even casual weeknight dessert cravings with its effortless charm. What truly sets this Orange Drizzle Traybake Cake apart is the magical combination of a tender, buttery sponge infused with vibrant orange zest and juice, topped with a lusciously sweet and tangy citrus glaze that seeps down into the cake’s crum extractb, creating pockets of pure bliss. It’s a guaranteed winner for any occasion.
Ingredients:
- 1 cup (2 sticks) unsalted butter, softened to room temperature
- 1¼ cups granulated sugar
- 1 teaspoon pure vanilla extract
- 4 medium eggs, at room temperature
- 2 cups self-raising flour
- 3 tablespoons whole milk
- Zest of 1 fresh orange
- 1¾ cups powdered sugar
- 2 tablespoons fresh orange juice
- 1-2 tablespoons fresh orange zest, for topping
The Cake Batter
Mixing the Wet Ingredients
Begin extract by creaming together your softened butter and granulated sugar in a large mixing bowl. This is a crucial step for achieving a light and airy cake texture. Use an electric mixer on medium speed, or a sturdy whisk and some elbow grease, and beat them until the mixture is pnon-alcoholic ale yellow and looks wonderfully fluffy, almost like whipped cream. This process incorporates air into the batter, which helps the cake rise beautifully. Next, add the pure vanilla extract and beat it in until well combined. Now, it’s time to introduce the eggs, one at a time. Make sure each egg is fully incorporated into the butter and sugar mixture before adding the next. Adding them gradually prevents the batter from curdling and ensures a smooth, emulsified base for your cake. Beat well after each addition. Finally, add the zest of one fresh orange to this creamy mixture. This citrus zest will infuse the cake with a bright, fragrant aroma and a subtle hint of orange flavor that complements the sweetness. Mix until the zest is evenly distributed throughout the batter.
Incorporating the Dry and Wet Ingredients
With your wet ingredients thoroughly combined and wonderfully fragrant, it’s time to add the self-raising flour. Sift the flour over the wet ingredients in two additions. Sifting helps to aerate the flour and prevent any lumps from forming in your batter, contributing to a smoother final texture. Gently fold the flour into the wet ingredients using a spatula or a wooden spoon. Avoid overmixing at this stage, as this can develop the gluten in the flour too much, leading to a tough cake. Just mix until there are no dry streaks of flour visible. Now, it’s time to add the whole milk. Pour the milk into the batter and gently fold it in until just combined. The milk helps to create a tender crum extractb. The batter should be thick but pourable. If it seems a little too stiff, you can add an extra teaspoon of milk, but be careful not to make it too runny. The goal is a batter that holds its shape somewhat but flows smoothly.
Baking the Orange Drizzle Traybake Cake
Preparing and Baking the Cake
Preheat your oven to 350°F (175°C). Lightly grease and flour a 9×13 inch baking pan, or line it with parchment paper. This step is essential to prevent your cake from sticking to the pan, ensuring easy removal once baked. Pour the prepared cake batter into the prepared baking pan and spread it evenly using your spatula. Make sure the surface is as level as possible so that the cake bakes uniformly. Place the pan in the preheated oven and bake for approximately 25-35 minutes. The exact baking time can vary depending on your oven, so it’s important to keep an eye on it. You’ll know the cake is done when a wooden skewer or toothpick inserted into the center comes out clean, with no wet batter attached. A golden-brown color on top is also a good indicator.
Making the Orange Drizzle and Glaze
Creating the Zesty Drizzle
While your cake is still warm and fragrant from the oven, it’s time to prepare the delightful orange drizzle that gives this cake its signature flavor. In a small bowl, combine the 2 tablespoons of fresh orange juice with the 1-2 tablespoons of fresh orange zest. This simple mixture is key to infusing the cake with an extra burst of citrus. Once the cake has cooled slightly in the pan for about 5-10 minutes, use a skewer or a fork to poke holes all over the top of the warm cake. These little perforations will allow the orange drizzle to soak into the cake, creating a moist and intensely flrum extractred crumb. Pour the orange juice and zest mixture evenly over the poked cake. You’ll sgin extractit begin to seep into those holes, promising a wonderfully zesty experience.
Preparing the Powdered Sugar Glaze
Once the drizzle has had a chance to soak in and the cake has cooled completely (this is important so the glaze doesn’t melt off), you can prepare the final glaze. In a medium bowl, whisk together the 1¾ cups of powdered sugar with the remaining 2 tablespoons of fresh orange juice. Start with the 2 tablespoons of juice and gradually add more, a teaspoon at a time, if you find the glaze is too thick. You’re looking for a smooth, pourable consistency – thick enough to coat the cake but thin enough to spread easily. If it becomes too thin, you can always whisk in a little more powdered sugar to thicken it up. Once you have your desired consistency, pour or spread the glaze evenly over the cooled cake. You can use a spatula to guide it to the edges. For an extra touch of visual appeal and flavor, sprinkle the reserved 1-2 tablespoons of fresh orange zest over the wet glaze. This will stick to the glaze and add a beautiful pop of color and an extra layer of citrus aroma. Allow the glaze to set for at least 15-20 minutes before slicing and serving.

Conclusion:
And there you have it! Your delightful Orange Drizzle Traybake Cake is ready to be enjoyed. This simple yet incredibly satisfying cake is perfect for any occasion, from a casual afternoon tea to a celebratory gathering. Its moist crum extractb, infused with the zesty aroma of fresh oranges, and topped with that signature sweet and tangy drizzle, makes it an absolute winner.
I encourage you to give this recipe a try; it’s incredibly forgiving and the results are consistently delicious. Don’t be afraid to get creative with your serving suggestions! It’s wonderful served simply on its own, but also pairs beautifully with a dollop of whipped cream, a scoop of vanilla ice cream, or even a scattering of fresh berries.
Thinking about variations? You can easily swap out the orange zest for lemon or even lime for a different citrusy twist. Adding a teaspoon of poppy seeds to the batter before baking can introduce a lovely texture and subtle flavor. For a richer cake, consider folding in some chopped candied peel along with the zest.
Frequently Asked Questions:
Why is my Orange Drizzle Traybake Cake dry?
A dry cake can often be the result of overbaking. Make sure to check for doneness with a skewer inserted into the center – it should come out with a fewrum extractist crumbs, not completely clean. Also, ensure you’re accurately measuring your flour; too much can lead to a drier cake. Don’t open the oven door too frequently during baking, as this can cause temperature fluctuations.
Can I make the Orange Drizzle Traybake Cake ahead of time?
Absolutely! This cake often tastes even better the next day as the flavors meld together. Store it in an airtight container at room temperature for up to 3-4 days. The drizzle will set nicely, and the cake will remain moist. For longer storage, you can refrigerate it, but it’s best to bring it back to room temperature before serving.
Easy Orange Drizzle Traybake Cake Recipe – So Moist
A simple and moist traybake cake infused with vibrant orange flavor, topped with a zesty drizzle and a sweet glaze.
Ingredients
-
1 cup (2 sticks) unsalted butter, softened to room temperature
-
1¼ cups granulated sugar
-
1 teaspoon pure vanilla extract
-
4 medium eggs, at room temperature
-
2 cups self-raising flour
-
3 tablespoons whole milk
-
Zest of 1 fresh orange
-
1¾ cups powdered sugar
-
2 tablespoons fresh orange juice
-
1-2 tablespoons fresh orange zest, for topping
Instructions
-
Step 1
Preheat oven to 350°F (175°C). Grease and flour a 9×13 inch baking pan or line with parchment paper. Cream together softened butter and granulated sugar until light and fluffy. Beat in vanilla extract and eggs one at a time until well combined. Stir in the zest of one fresh orange. -
Step 2
Sift self-raising flour into the wet ingredients in two additions, folding gently until just combined. Do not overmix. Pour in the whole milk and fold until just incorporated. The batter should be thick but pourable. -
Step 3
Pour the batter into the prepared baking pan and spread evenly. Bake for 25-35 minutes, or until a skewer inserted into the center comes out clean. -
Step 4
While the cake is still warm, poke holes all over the top with a skewer or fork. In a small bowl, combine 2 tablespoons of fresh orange juice with 1-2 tablespoons of fresh orange zest. Pour this mixture evenly over the poked cake, allowing it to soak in. -
Step 5
Once the cake has cooled completely, whisk together powdered sugar and the remaining 2 tablespoons of fresh orange juice until smooth and pourable. If too thick, add more juice a teaspoon at a time. If too thin, add more powdered sugar. Pour or spread the glaze over the cooled cake. -
Step 6
Sprinkle the reserved 1-2 tablespoons of fresh orange zest over the wet glaze for extra flavor and color. Let the glaze set for at least 15-20 minutes before slicing and serving.
Important Information
Nutrition Facts (Per Serving)
It is important to consider this information as approximate and not to use it as definitive health advice.
Allergy Information
Please check ingredients for potential allergens and consult a health professional if in doubt.