Brown Butter Brookies – Decadent Chocolate Chip Blondie Brownie Bars
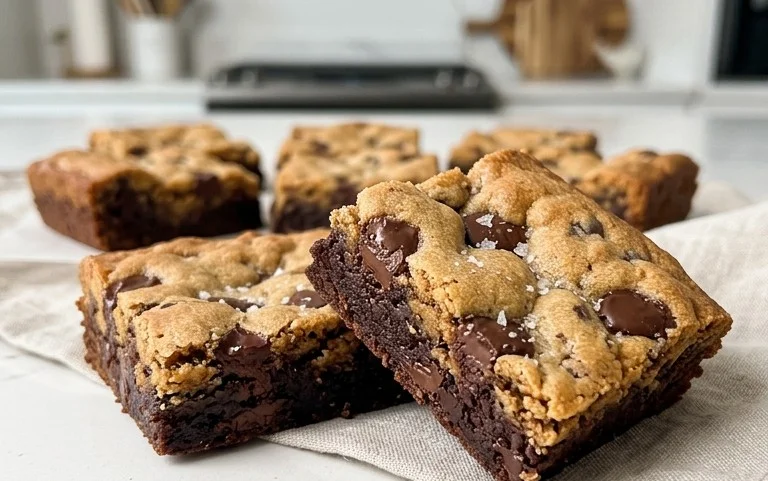
Brown butter brookies are an absolute revelation, a decadent dessert that bridges the gap between two beloved classics: the rich, fudgy brownie and the chewy, buttery cookie. If you’ve never experienced the magic of a brookie, prepare yourself for pure bliss. We’re talking about a perfectly baked square that offers a delightful textural contrast with every bite. First, you encounter the slightly crisp edge of the cookie, giving way to a soft, chewy interior, all infused with the nutty, caramel notes of brown butter. Then, you hit the dense, chocolatey heart of the brownie, melting in your mouth with an intense cocoa flavor. What makes these brown butter brookies so utterly irresistible is this harmonious combination, a symphony of textures and tastes that caters to every sweet craving. It’s the ultimate treat for any occasion, or for absolutely no reason at all, because you deserve it.
Brown Butter Brookies
Get ready to elevate your dessert game with these absolutely divine brown butter brookies! This recipe is a fusion of two beloved classics: the rich, fudgy brownie and the chewy, buttery cookie. And the secret weapon? Brown butter! Browning the butter adds an incredible depth of nutty, caramelized flavor that transforms both the brownie and cookie layers into something truly spectacular. I’ve spent a lot of time perfecting this recipe, and I’m so excited for you to try it. The combination of textures and flavors – the crisp edges, the chewy interior, the intense chocolate – is pure bliss.
Ingredients:
Instructions:
Brown Butter Magic: The Foundation of Flavor
The very first step, and arguably the most important for achieving that signature flavor, is to brown the butter for both layers. This might sound intimidating, but it’s quite simple and adds an unparalleled depth. Take your 180g of butter for the brownie layer and melt it in a light-colored saucepan over medium heat. Swirl the pan occasionally. You’ll notice the butter start to foam, and then tiny brown specks will begin extract to appear at the bottom of the pan. These specks are milk solids toasting, and they are the source of that magical nutty aroma. Don’t walk away during this process, as it can go from perfectly browned to burnt very quickly. Once the butter has a rich amber color and smells wonderfully nutty, immediately remove it from the heat and pour it into a heatproof bowl to stop the cooking. Repeat this process with the 80g of butter for the cookie layer, ensuring you use separate bowls or thoroughly clean your saucepan. Let both bowls of brown butter cool slightly while you prepare the other components.
Crafting the Rich Brownie Base
In a large bowl, whisk together the 120g of all-purpose flour and 50g of cocoa powder. Sifting these together will ensure a lump-free, smooth brownie base. In a separate, larger bowl, combine the 180g of granulated sugar and 80g of brown sugar. Pour the slightly cooled brown butter (from the first step) into the sugar mixture and whisk until well combined. This will start to dissolve some of the sugars and create a lovely glossy base. Now, it’s time to add the eggs. Add the 4 eggs, one at a time, whisking well after each addition until the mixture is smooth and emulsified. You’re looking for a rich, chocolatey batter. Gently fold in the flour and cocoa mixture until just combined. Be careful not to overmix at this stage, as it can lead to tougher brownies. If you’re using the optional chocolate chunks, now is the time to gently fold them in. Pour this brownie batter into a parchment-lined 8×8 inch baking pan, spreading it evenly.
Whipping Up the Irresistible Cookie Dough
In a medium bowl, combine the 85g of all-purpose flour, 1g of salt, and 40g of granulated sugar. Whisk these dry ingredients together. In a separate bowl, cream together the 80g of brown sugar and the slightly cooled brown butter (from the second browning step) until light and fluffy. This is where that beautiful brown butter flavor really shines through. Beat in the single egg until the mixture is smooth and well incorporated. Gradually add the dry ingredients to the wet ingredients, mixing until just combined. Again, avoid overmixing to maintain a tender cookie texture. The dough will be slightly sticky, which is exactly what we want for those perfect chewy cookies.
Layering and Baking Perfection
Now for the fun part: assembling your brookies! You’ve got your brownie batter spread evenly in the prepared pan. Take spoonfuls of the cookie dough and dollop them all over the brownie batter. Don’t worry about making them perfectly round or covering every single inch; the cookie dough will spread as it bakes, creating those beautiful marbled patterns. Use the back of a spoon or a small offset spatula to gently swirl the cookie dough into the brownie batter. This isn’t about creating a perfect blend, but rather a lovely marbled effect.
Preheat your oven to 175°C (350°F). Bake the brookies for 30-35 minutes, or until the edges are set and a toothpick inserted into the center comes out with moist crum extractbs attached. You want the brownies to be fudgy and the cookies to be chewy, so avoid overbaking. Once out of the oven, let them cool completely in the pan on a wire rack. This cooling period is crucial for the brookies to set properly, making them easier to cut and ensuring the perfect texture.
The Final Flourish and Serving Suggestions
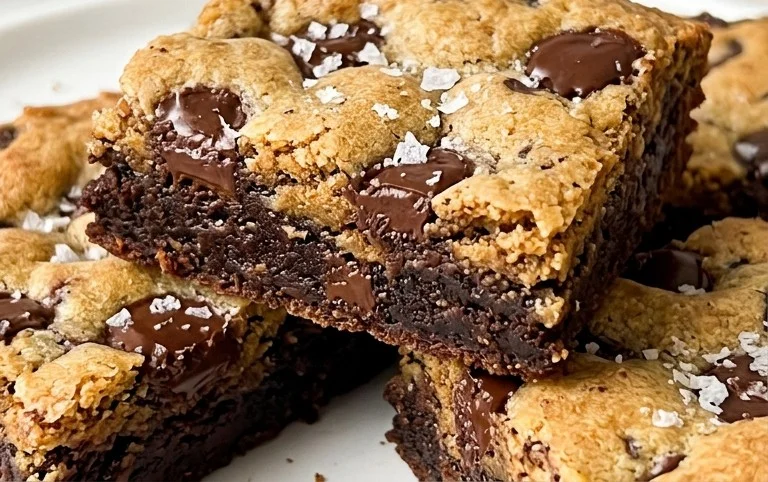
Once completely cooled, lift the brookies out of the pan using the parchment paper. Cut them into squares. For an extra touch of indulgence, you can sprinkle a little flaky sea salt on top before cutting, which beautifully contrasts with the sweetness. These brown butter brookies are fantastic on their own, but they are also divine served warm with a scoop of vanilla ice cream or a drizzle of extra melted chocolate. The combination of the warm, gooey brookie and cold ice cream is an experience you won’t forget. Enjoy every single decadent bite!
Conclusion:
And there you have it – the ultimate guide to creating incredible Brown Butter Brookies! We’ve explored how the nutty depth of brown butter elevates both the chewy brownie and the buttery blondie layers, resulting in a truly spectacular dessert that’s greater than the sum of its parts. The interplay of textures, from the fudgy brownie to the slightly crisp edges of the blondie, is simply divine. These brookies are perfect for any occasion, be it a casual get-together, a celebratory bake, or just a treat to brighten your day. I highly encourage you to give this brown butter brookie recipe a try – I promise you won’t be disappointed!
For serving, I love them warm, perhaps with a scoop of vanilla bean ice cream for an irresistible contrast. They also hold up beautifully at room temperature, making them ideal for picnics or potlucks. If you’re feeling adventurous, consider adding a sprinkle of sea salt on top before baking to enhance the sweetness, or swirl in some caramel for an extra layer of indulgence. Experiment with different chocolate chip combinations – dark, milk, or white chocolate all work wonderfully.
Frequently Asked Questions:
Can I make these brown butter brookies ahead of time?
Absolutely! Brown Butter Brookies are fantastic for making ahead. Once cooled completely, store them in an airtight container at room temperature for up to 3-4 days. They often taste even better the next day as the flavors meld together.
What is the best way to store leftover brookies?
To keep your brookies fresh and delicious, store them in an airtight container at room temperature. If your kitchen is particularly warm, a day or two in the refrigerator is also an option, but be sure to let them come back to room temperature before serving for the best texture.
Can I freeze brown butter brookies?
Yes, you can! Once completely cooled, wrap individual brookies or a whole pan tightly in plastic wrap, then in foil. They can be frozen for up to 2-3 months. Thaw them at room temperature.
Brown Butter Brookies
A decadent fusion of chewy chocolate chip cookies and fudgy brownies, enhanced with the nutty depth of brown butter. This recipe combines two layers for ultimate indulgence.
Ingredients
-
180 g butter
-
320 g chocolate (for melting – 60% chocolate bars)
-
120 g all purpose flour
-
50 g cocoa powder
-
180 g Granulated Sugar
-
80 g brown sugar
-
2 g salt
-
4 eggs
-
120 g chocolate chunks (optional)
-
85 g all-purpose flour
-
80 g butter
-
80 g brown sugar
-
40 g granulated sugar
-
1 g salt
-
1 egg
Instructions
-
Step 1
For the brownie layer: Melt 180g butter in a saucepan until browned and nutty. Remove from heat. Melt 320g chocolate separately and stir into the browned butter. In a separate bowl, whisk together 120g flour, 50g cocoa powder, 180g granulated sugar, 80g brown sugar, and 2g salt. Add the chocolate-butter mixture and 4 eggs to the dry ingredients and mix until just combined. Stir in optional chocolate chunks. -
Step 2
For the cookie layer: In a separate bowl, cream 80g butter with 80g brown sugar and 40g granulated sugar until light and fluffy. Beat in 1 egg. In another bowl, whisk together 85g all-purpose flour and 1g salt. Gradually add the dry ingredients to the wet ingredients, mixing until just combined. -
Step 3
Prepare a baking pan (e.g., 9×13 inch) by lining it with parchment paper, leaving an overhang for easy removal. -
Step 4
Spread the brownie batter evenly into the prepared pan. -
Step 5
Dollop spoonfuls of the cookie dough over the brownie batter and gently spread to cover as much of the surface as possible. Swirl the two batters together slightly with a knife or skewer for a marbled effect. -
Step 6
Bake in a preheated oven at 175°C (350°F) for 30-35 minutes, or until a toothpick inserted into the center comes out with moist crumbs. -
Step 7
Let cool completely in the pan before cutting into bars.
Important Information
Nutrition Facts (Per Serving)
It is important to consider this information as approximate and not to use it as definitive health advice.
Allergy Information
Please check ingredients for potential allergens and consult a health professional if in doubt.