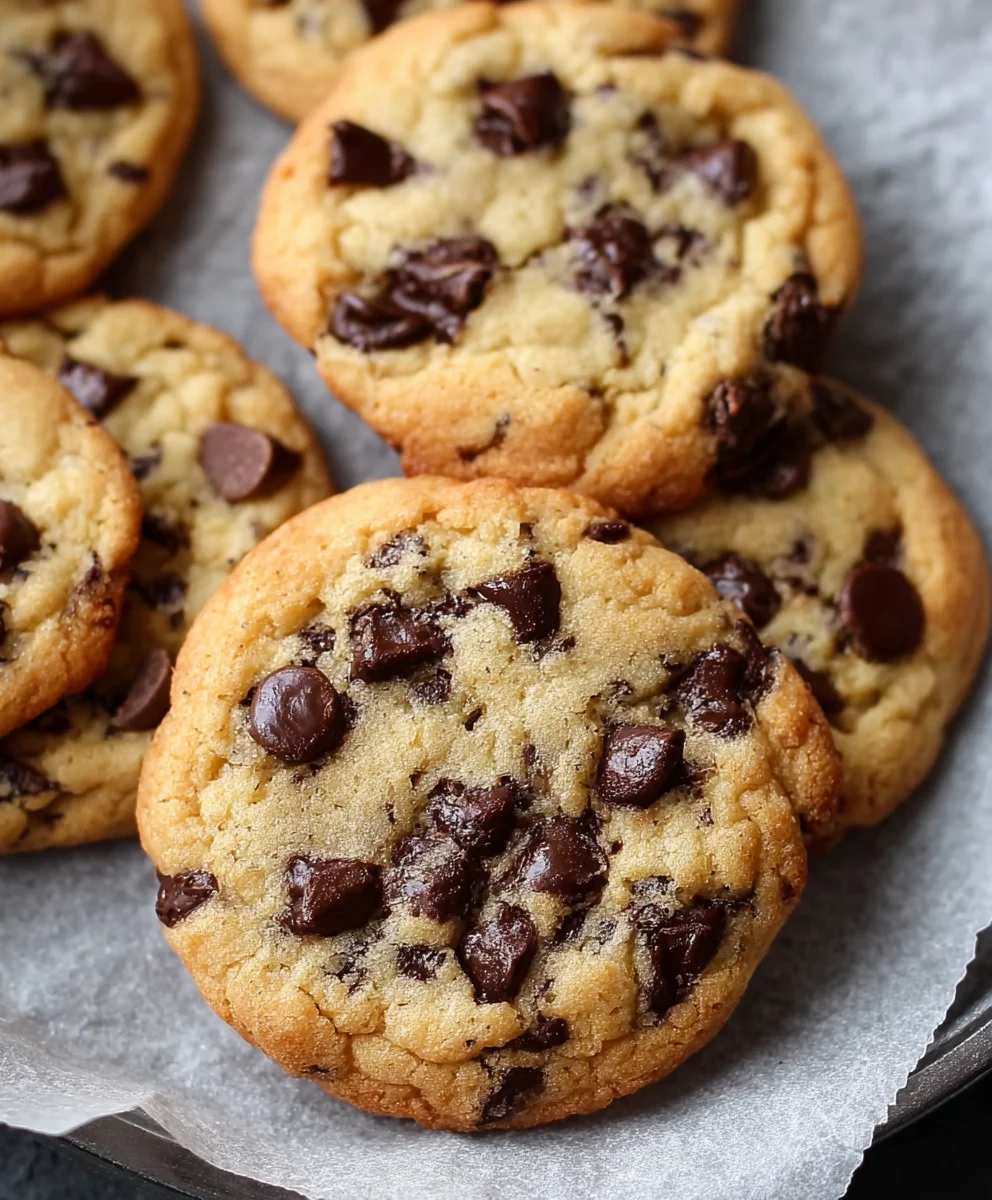
Easy Air Fryer Chocolate Chip Cookies-Quick & Delicious
Air Fryer Chocolate Chip Cookies are more than just a treat; they’re a gateway to instant gratification and pure, unadulterated joy. Forget the lengthy preheating times and the anxiety of slightly burnt edges. With this recipe, you can achieve perfectly golden-brown, chewy-centered chocolate chip cookies in a fraction of the time, all thanks to the magic of your air fryer. Why do we absolutely adore this method? It’s the speed, the convenience, and the surprisingly consistent results that deliver that classic, comforting flavor we all crave. What truly makes these air fryer chocolate chip cookies so special is how they capture that perfect balance of a slightly crisp exterior giving way to a wonderfully soft and gooey interior. It’s the ultimate shortcut to a warm, homemade cookie experience whenever the craving strikes.
Ingredients:
- 1/2 cup (1 stick) unsalted butter, softened
- 1/2 cup packed brown sugar
- 1/4 cup granulated white sugar
- 1 large egg, at room temperature
- 1 teaspoon pure vanilla extract
- 1 1/2 cups all-purpose flour
- 1 teaspoon baking soda
- 1/4 teaspoon fine sea salt
- 1 cup semi-sweet chocolate chips
Getting Started with Your Air Fryer Chocolate Chip Cookies
This recipe is designed to deliver perfectly chewy and delightfully gooey Air Fryer Chocolate Chip Cookies, with crisp edges and a tender center. The air fryer is surprisingly adept at baking small batches of cookies, making it ideal for those moments when a full oven feels like overkill, or when you simply crave a fresh batch of warm cookies in a flash. We’ll start by bringin extractg together our wet ingredients, which will form the base of our cookie dough.
First, ensure your butter is softened to room temperature. This is crucial for creaming the butter and sugars properly. If you forget to take it out of the fridge in advance, you can gently soften it by cutting it into smaller cubes and letting it sit on the counter for about 15-20 minutes, or by very carefully microwaving it in 10-second bursts, just until it’s soft but not melted. In a medium mixing bowl, combine the softened unsalted butter, packed brown sugar, and granulated white sugar. Using an electric mixer (handheld or stand mixer with a paddle attachment), cream these ingredients together until the mixture is light, fluffy, and pnon-alcoholic ale in color. This creaming process incorporates air, which contributes to the cookie’s texture. Scrape down the sides of the bowl as needed to ensure everything is thoroughly combined.
Next, add the egg and vanilla extract to the creamed butter and sugar mixture. If your egg is cold, you can quickly warm it by placing it in a bowl of warm water for 5-10 minutes. Beat the egg and vanilla extract into the mixture until just combined and the batter looks smooth and uniform. Be careful not to overmix at this stage; we’re just looking for everything to be incorporated.
Incorporating the Dry Ingredients and Chocolatey Goodness
Now it’s time to add our dry ingredients. In a separate, smaller bowl, whisk together the all-purpose flour, baking soda, and salt. Whisking these ingredients together before adding them to the wet mixture helps to distribute the leavening agent (baking soda) and salt evenly throughout the flour, preventing pockets of bitterness or uneven rising in your cookies.
Gradually add the dry ingredients to the wet ingredients, mixing on low speed or by hand with a spatula until just combined. Again, resist the urge to overmix the dough once the flour is added. Overmixing can develop the gluten in the flour too much, resulting in tough cookies. We want a tender crum extractb, so stop mixing as soon as you no longer see streaks of dry flour. The dough will be quite thick at this point.
Finally, fold in the semi-sweet chocolate chips. Use a sturdy spatula or wooden spoon for this step. Distribute the chocolate chips evenly throughout the dough. Some people like to reserve a few chips to press onto the tops of the cookies before baking for an extra-chocolatey aesthetic, which is a great optional step if you’re feeling fancy.
Prepping and Air Frying Your Cookies
Before we start air frying, it’s a good idea to preheat your air fryer. Most air fryers work best when preheated, and this helps ensure even cooking and browning of your cookies. Set your air fryer to 350 degrees Fahrenheit (175 degrees Celsius) and let it heat up for about 3-5 minutes. While the air fryer is preheating, you’ll want to prepare your air fryer basket. You can line it with parchment paper specifically designed for air fryers, or use a silicone mat. If using parchment paper, make sure it has holes or that you cut some into it to allow for proper air circulation. Alternatively, you can lightly grease the basket.
Now it’s time to form your cookie dough balls. For consistent sizing and baking, I recommend using a small cookie scoop or measuring out about 1 to 1.5 tablespoons of dough for each cookie. Roll the dough into smooth balls. Don’t flatten them; they will spread as they bake. Arrange the cookie dough balls in a single layer in your prepared air fryer basket, ensuring there is space between each cookie. Do not overcrowd the basket, as this will prevent air from circulating properly, leading to unevenly cooked cookies. You will likely need to bake in batches.
The Air Frying Process and Perfecting Your Cookies
Place the air fryer basket into the preheated air fryer and cook the cookies at 350 degrees Fahrenheit (175 degrees Celsius) for 7-10 minutes. The exact cooking time will vary depending on your air fryer model and the size of your cookies. Keep a close eye on them, especially during the first batch. You’re looking for the edges to be lightly golden brown and set, while the centers should still appear slightly soft and underbaked. This is key to achieving that perfect chewy texture. If they look too brown on top, you can loosely tent them with foil.
Once the cookies have reached your desired doneness, carefully remove the air fryer basket from the appliance. Let the cookies cool in the basket for 2-3 minutes before attempting to move them. This resting period allows them to firm up further. Then, using a spatula, carefully transfer the cookies to a wire rack to cool completely. This prevents the bottoms from becoming soggy from residual heat. If you want to enjoy them warm and gooey, you can certainly eat them after they’ve cooled just enough not to burn your fingers. Repeat the air frying process with the remaining dough, making sure to allow the air fryer basket to cool slightly between batches if necessary to maintain consistent cooking temperatures. Enjoy your freshly baked Air Fryer Chocolate Chip Cookies!

Conclusion:
And there you have it – your guide to perfectly golden and chewy Air Fryer Chocolate Chip Cookies! We’ve walked through each step, ensuring you’ll achieve that delightful homemade taste and texture without even turning on your oven. These cookies are incredibly versatile, making them a fantastic treat for any occasion, from a quick afternoon snack to a delightful addition to a cookie platter. Remember, the key to success lies in not overcrowding the air fryer basket and keeping a close eye on the baking time, as air fryers can vary.
For serving, these Air Fryer Chocolate Chip Cookies are best enjoyed warm, perhaps with a glass of cold milk or a scoop of vanilla ice cream. They also make a wonderful edible gift, tied up with a ribbon!
Don’t be afraid to experiment with variations! You can add chopped nuts like walnuts or pecans, swap out the chocolate chips for white chocolate or butterscotch, or even sprinkle a little sea salt on top before baking for a sweet and salty kick. Most importantly, have fun with it! Baking should be a joyful experience, and these simple yet delicious Air Fryer Chocolate Chip Cookies are sure to bring smiles to everyone’s faces.
Frequently Asked Questions:
Q1: My Air Fryer Chocolate Chip Cookies are spreading too much. What can I do?
If your cookies are spreading excessively, the dough might be too warm. Try chilling the dough for at least 30 minutes before baking. Also, ensure you’re not over-creaming the butter and sugar, as this can introduce too much air and lead to spreading. Make sure your butter is softened but not melted.
Q2: Can I make the dough for these Air Fryer Chocolate Chip Cookies ahead of time?
Absolutely! The dough for Air Fryer Chocolate Chip Cookies can be made up to 2-3 days in advance and stored in an airtight container in the refrigerator. Letting the dough chill for a longer period actually enhances the flavor by allowing the ingredients to meld.
Easy Air Fryer Chocolate Chip Cookies
Quick and delicious chewy chocolate chip cookies baked to perfection in your air fryer.
Ingredients
-
1/2 cup (1 stick) unsalted butter, softened
-
1/2 cup packed brown sugar
-
1/4 cup granulated white sugar
-
1 large egg, at room temperature
-
1 teaspoon pure vanilla extract
-
1 1/2 cups all-purpose flour
-
1 teaspoon baking soda
-
1/4 teaspoon fine sea salt
-
1 cup semi-sweet chocolate chips
Instructions
-
Step 1
In a medium bowl, cream together softened butter, brown sugar, and white sugar until light and fluffy. -
Step 2
Beat in the egg and vanilla extract until just combined and smooth. -
Step 3
In a separate bowl, whisk together flour, baking soda, and salt. Gradually add to wet ingredients, mixing until just combined. Fold in chocolate chips. -
Step 4
Preheat air fryer to 350°F (175°C). Line air fryer basket with parchment paper or grease lightly. Form dough into 1-1.5 tablespoon balls and place in a single layer in the basket, ensuring space between cookies. -
Step 5
Air fry for 7-10 minutes, or until edges are golden brown and centers are still slightly soft. Let cool in the basket for 2-3 minutes, then transfer to a wire rack to cool completely.
Important Information
Nutrition Facts (Per Serving)
It is important to consider this information as approximate and not to use it as definitive health advice.
Allergy Information
Please check ingredients for potential allergens and consult a health professional if in doubt.