Easy Homemade Bread Recipe – Perfect Crusty Loaf
Homemade bread isn’t just a recipe; it’s an experience. There’s a certain magic that happens when simple ingredients like flour, water, yeast, and salt transform into something warm, fragrant, and utterly delicious. The aroma alone, wafting through your kitchen as it bakes, is enough to bring a smile to anyone’s face. People fall in love with this culinary endeavor for so many reasons: the satisfaction of creating something with your own hands, the unparalleled freshness and flavor compared to store-bought loaves, and the sheer comfort it provides. This isn’t just about sustenance; it’s about slowing down, connecting with tradition, and enjoying the simple pleasure of a perfect slice. What truly makes homemade bread special is the personal touch you can imbue into it, from the texture of the crum extractb to the subtle hints of herbs or seeds you might add. Get ready to embark on a journey to create your very own masterpiece of homemade bread.
Homemade Bread
There’s nothing quite like the aroma of freshly baked bread wafting through your home. That warm, comforting scent is a promise of deliciousness, and the taste of homemade bread is truly unparalleled. Forget the store-bought loaves that often lack character and freshness. Today, we’re embarking on a journey to create a beautiful, crusty, and delightfully soft loaf right in your own kitchen. This recipe is designed to be approachable for begin extractners, with clear instructions and a little bit of magic thrown in. Get ready to impress yourself and everyone you share this with.
Ingredients:
*Note on Yeast and Flour: For the most reliable results, especially if you’re new to bread making, I highly recommend using bread flour. It has a higher protein content which develops more gluten, leading to a chewier texture and better rise. Active dry yeast is readily available and works beautifully for this recipe. Ensure your yeast is fresh by checking the expiration date.
The Dough-Making Process: Bringin extractg it All Together
1. Activating the Yeast: In a large mixing bowl, combine the warm water and your chosen sweetener (honey or sugar). Gently sprinkle the active dry yeast over the surface of the liquid. Do not stir it in immediately. Let it sit for about 5-10 minutes. You should see a foamy, bubbly layer form on the surface. This “blooming” process indicates that your yeast is alive and ready to work its magic. If you don’t see any activity, your yeast might be old or the water temperature was off. In that case, it’s best to start over with fresh yeast and properly tempered water. This is a crucial first step for a good rise.
2. Mixing the Dough: Once the yeast has bloomed, add the salt and oil to the same bowl. Now, begin extract adding the flour, about one cup at a time, mixing well after each addition. I find using a sturdy wooden spoon or a dough whisk works well at this stage. As you incorporate the flour, the mixture will start to come together and form a shaggy dough. Once the dough becomes too stiff to stir easily with the spoon, it’s time to get your hands involved. Continue adding flour gradually until the dough is no longer excessively sticky, but still has a slight tackiness to it. The amount of flour needed can vary depending on humidity and the type of flour you’re using, so don’t be afraid to adjust. Aim for a dough that pulls away from the sides of the bowl.
Kneading for Gluten Development
3. Kneading the Dough: This is where the real work and the reward begin extract! Lightly flour a clean work surface. Turn the shaggy dough out onto the floured surface. Begin extract kneading by pushing the dough away from you with the heel of your hand, then folding it back over itself. Rotate the dough and repeat the process. Continue kneading for about 8-10 minutes. You’re looking for the dough to become smooth, elastic, and slightly tacky but not sticky. If the dough is too sticky, add a little more flour, a tablespoon at a time, to your hands and the work surface. Conversely, if it feels too dry and crum extractbly, you can dampen your hands slightly with water. A well-kneaded dough will spring back slowly when gently poked. This elasticity is due to the development of gluten, which gives bread its structure.
The First Rise: Letting the Dough Bloom
4. The First Proof (Rising): Lightly grease a clean bowl with a little oil. Place the kneaded dough into the oiled bowl, turning it to coat all sides. Cover the bowl tightly with plastic wrap or a clean kitchen towel. Place the bowl in a warm, draft-free spot to rise. An oven with the light on (but the oven itself off) is often a perfect place. Allow the dough to rise for about 1 to 1.5 hours, or until it has doubled in size. This process is called proofing, and it’s when the yeast works its magic, producing carbon dioxide gas that makes the dough light and airy. Patience is key here; don’t rush this step.
Shaping and the Second Rise
5. Shaping the Loaf: Once the dough has doubled, gently punch it down to release the trapped air. Turn the dough out onto your lightly floured work surface again. At this point, you can shape your dough into your desired loaf. For a classic loaf, gently pat and fold the dough into a rectangular shape, then roll it up tightly from one end, pinching the seam to seal. You can also create a round boule or divide the dough for smaller rolls. Place the shaped loaf into a greased loaf pan, or onto a baking sheet lined with parchment paper if you’re making a free-form loaf.
6. The Second Proof: Cover the shaped loaf loosely with plastic wrap or a kitchen towel. Let it rise again for another 30-45 minutes, or until it has noticeably increased in size and looks puffy. This second rise, or proof, is essential for a light and airy texture in the final baked bread. While the dough is undergoing its second rise, preheat your oven to 375 degrees Fahrenheit (190 degrees Celsius). If you’re using a baking stone or steel, place it in the oven during preheating.
Baking to Perfection
7. Baking the Bread: Once the oven is preheated and the dough has completed its second rise, it’s time to bake! For a beautiful golden-brown crust, you can brush the top of the loaf with a little milk or an egg wash just before baking. Carefully place the loaf into the preheated oven. Bake for 30-40 minutes, or until the crust is a deep golden brown and the internal temperature of the bread reaches 190-200 degrees Fahrenheit (88-93 degrees Celsius) when tested with an instant-read thermometer. If the crust is browning too quickly, you can loosely tent the loaf with aluminum foil.
Cooling: The Final, Crucial Step
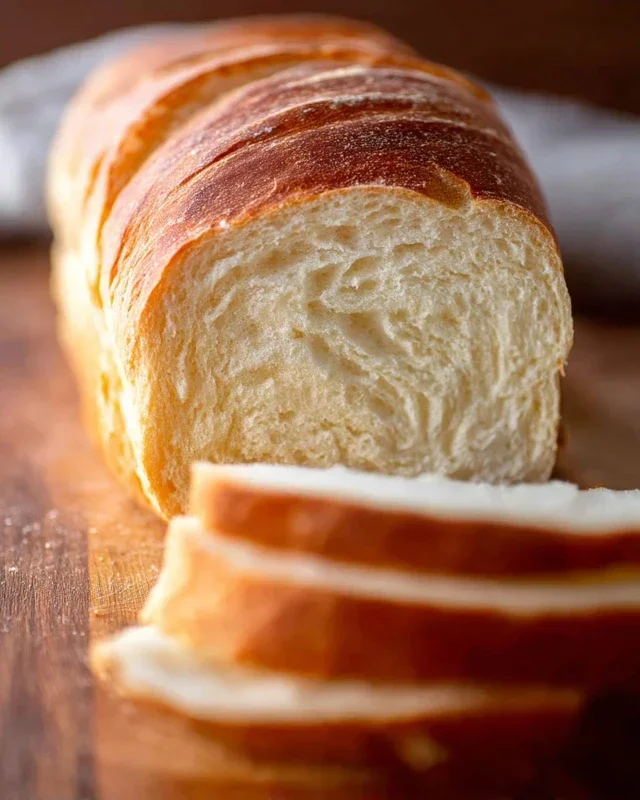
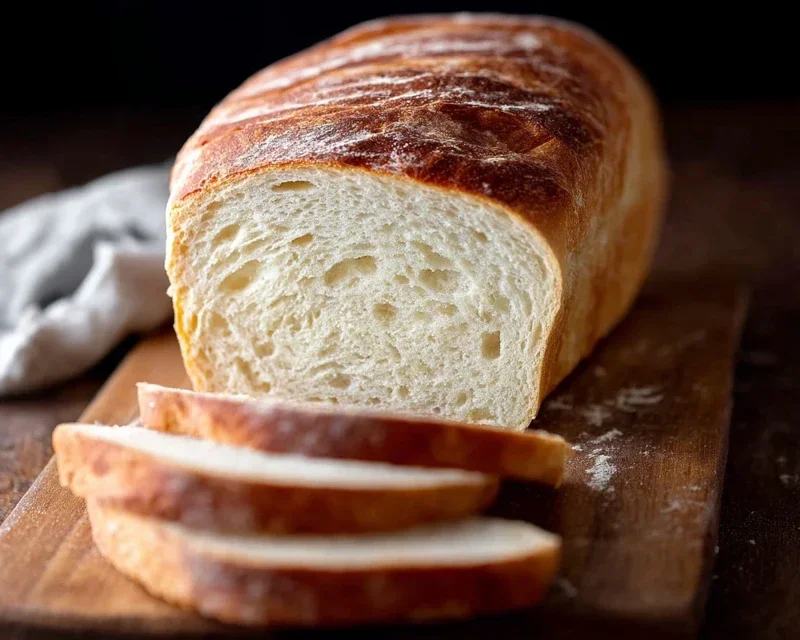
8. Cooling the Bread: This is perhaps the hardest part for any baker – waiting! As soon as the bread comes out of the oven, immediately remove it from the loaf pan and place it on a wire rack to cool completely. This is crucial to prevent the bottom crust from becoming soggy. Resist the urge to slice into it while it’s still hot; the internal structure needs time to set. Once completely cooled, slice with a serrated knife and enjoy the fruits of your labor. The satisfaction of biting into a slice of your own homemade bread is truly immense.
Conclusion:
You’ve done it! You’ve embarked on the incredibly rewarding journey of making your very own homemade bread. This recipe isn’t just about creating a loaf; it’s about unlocking a world of delicious possibilities right in your kitchen. The aroma that fills your home as it bakes is simply non-intoxicating, a testament to the magic of simple ingredients transformed. The unparalleled texture, that perfect crusty exterior giving way to a soft, pillowy interior, is something store-bought just can’t replicate.
Now that you have this fantastic foundation, the serving opportunities are endless. Slice it thick for hearty sandwiches, toast it for a delightful breakfast with butter and jam, or serve it warm alongside your favorite soup or stew. Don’t be afraid to experiment with variations! Consider adding herbs, seeds, or even a touch of honey to the dough for a unique twist. I truly encourage you to give this homemade bread recipe a try. The satisfaction of pulling that golden loaf from your oven is immense, and the taste is even better. You’ll be hooked!
Frequently Asked Questions:
Why is my bread dough not rising?
This is a common concern! Several factors can affect dough rise. Ensure your yeast is fresh and active; test it by dissolving it in warm water with a pinch of sugar – it should bubble within 5-10 minutes. Make sure your water temperature for activating yeast is warm, not hot, as too much heat can kill it. Also, check that your proofing environment is warm enough – a slightly warm oven (turned off!) or a sunny spot can work wonders. Consistent temperature is key.
Can I make this bread ahead of time?
Absolutely! Once completely cooled, your homemade bread can be stored in an airtight container or bread bag at room temperature for 2-3 days. For longer storage, it freezes beautifully. Slice the cooled loaf, wrap it tightly in plastic wrap, then in foil, and freeze for up to 3 months. Thaw at room temperature or reheat slices briefly in the oven or toaster.
Homemade Bread
A classic recipe for soft and delicious homemade bread, perfect for sandwiches or toast.
Ingredients
-
2 cups warm water (105-115 degrees)
-
1 Tablespoons active dry yeast
-
1/4 cup honey
-
2 teaspoons salt
-
2 Tablespoons canola oil
-
4 cups all-purpose flour
Instructions
-
Step 1
In a large bowl, combine warm water, honey, and yeast. Let stand for 5-10 minutes until foamy. -
Step 2
Stir in salt and oil. -
Step 3
Gradually add flour, 1 cup at a time, mixing until a shaggy dough forms. Knead on a floured surface for 8-10 minutes until smooth and elastic. -
Step 4
Place dough in a lightly oiled bowl, cover, and let rise in a warm place for 1-1.5 hours, or until doubled in size. -
Step 5
Punch down dough, shape into a loaf, and place in a greased loaf pan. Cover and let rise for another 30-45 minutes. -
Step 6
Bake in a preheated oven at 375°F (190°C) for 30-35 minutes, until golden brown and hollow-sounding when tapped.
Important Information
Nutrition Facts (Per Serving)
It is important to consider this information as approximate and not to use it as definitive health advice.
Allergy Information
Please check ingredients for potential allergens and consult a health professional if in doubt.