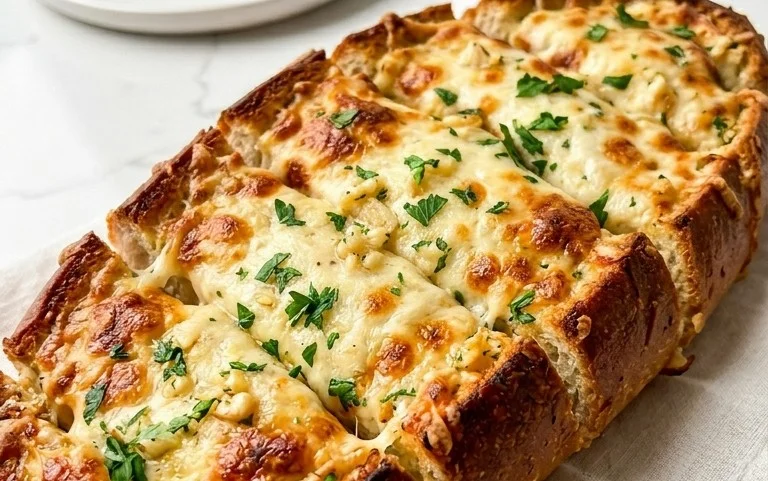
Best Cheesy Garlic Bread – Easy Homemade Recipe
BEST CHEESY GARLIC BREAD RECIPE: Oh, that glorious, irresistible aroma. That golden-brown crust, yielding to a warm, pillowy interior, all blanketed in a symphony of melted cheese and pungent garlic. It’s more than just bread; it’s pure comfort, a universally beloved side that elevates any meal from ordinary to extraordinary. What is it about this simple combination that captures our hearts and taste buds so completely? Perhaps it’s the primal satisfaction of warm, savory goodness, or the way the garlic butter permeates every bite, creating a flavor explosion that’s both bold and comforting. This isn’t just any cheesy garlic bread; this is THE BEST CHEESY GARLIC BREAD RECIPE, meticulously crafted to deliver that perfect balance of crispy, chewy, and utterly decadent deliciousness. Get ready to make a batch that will disappear in minutes!
BEST CHEESY GARLIC BREAD RECIPE
There are few things in life as universally beloved as a perfectly baked, gooey, cheesy garlic bread. It’s the ultimate comfort food, the ideal sidekick to pasta dishes, soups, or even just enjoyed on its own with a glass of grape juice. Forget those pre-packaged, often disappointing versions; making truly exceptional garlic bread at home is surprisingly simple, and the results are exponentially more rewarding. This recipe, using the magic of King’s Hawaiian Rolls for unparalleled softness and sweetness, is guaranteed to become your go-to for impressing guests or simply indulgin extractg yourself.
Ingredients:
Preparation Steps
The foundation of any truly magnificent garlic bread is, of course, the garlic. While you can mince raw garlic and mix it into your butter, roasting the garlic first elevates its flavor profile dramatically. It mellows out the sharpness, bringin extractg out a sweet, nutty depth that is simply divine.
Roasting the Garlic
1. To start, preheat your oven to 400°F (200°C). Take your 8-10 garlic cloves and trim off the very tip of each clove, exposing the individual segments slightly.
2. Place the trimmed garlic cloves on a small piece of aluminum foil. Drizzle them with 2 tablespoons of olive oil and sprinkle with a pinch of salt.
3. Gather the edges of the foil to create a senon-alcoholic aled packet. Place this packet on a small baking sheet (to catch any potential drips) and roast in the preheated oven for about 30-40 minutes, or until the garlic is soft and golden brown.
4. Once roasted, carefully open the foil packet (watch out for steam!) and let the garlic cool slightly. You’ll then gently squeeze the softened garlic cloves out of their papery skins. The roasted garlic should be a soft, spreadable paste. Mash it with a fork.
Making the Cheesy Garlic Butter Mixture
Now, let’s get to the heart of the flavor – the garlic butter. This is where the magic happens, infusing every bite with rich, savory goodness.
1. In a medium bowl, combine the ½ cup of melted butter with the mashed roasted garlic. This is your flavor base.
2. Next, whisk in 1 egg. The egg acts as a binder, helping the butter mixture adhere to the bread and creating a lovely crust.
3. Add the ¼ cup of milk, ½ teaspoon of salt, and ½ teaspoon of paprika. The milk helps to create a slightly creamier texture, and the paprika adds a hint of color and subtle smoky note.
4. Finally, stir in the 2 tablespoons of chopped fresh parsley. The fresh herbs add a burst of brightness that perfectly complements the richness of the butter and garlic. Mix everything until it’s thoroughly combined into a luscious, spreadable mixture.
Assembling and Baking the Garlic Bread
This is where your King’s Hawaiian Rolls truly shine. Their inherent sweetness and incredibly soft texture are the perfect canvas for this savory topping. If you’re using a baguette, slice it lengthwise.
1. Prepare your King’s Hawaiian Sheet Rolls. If you’re using the sheet form, you’ll want to cut them into individual portions before or after applying the topping, depending on your preference. For ease of eating and even distribution of the topping, I like to gently slice them in half horizontally while still in the sheet form, almost like making a giant sandwich, then cut through the sheet into individual rolls.
2. Generously spread the cheesy garlic butter mixture over the cut surfaces of the rolls, ensuring an even coating from edge to edge. Don’t be shy; this is what makes it truly irresistible.
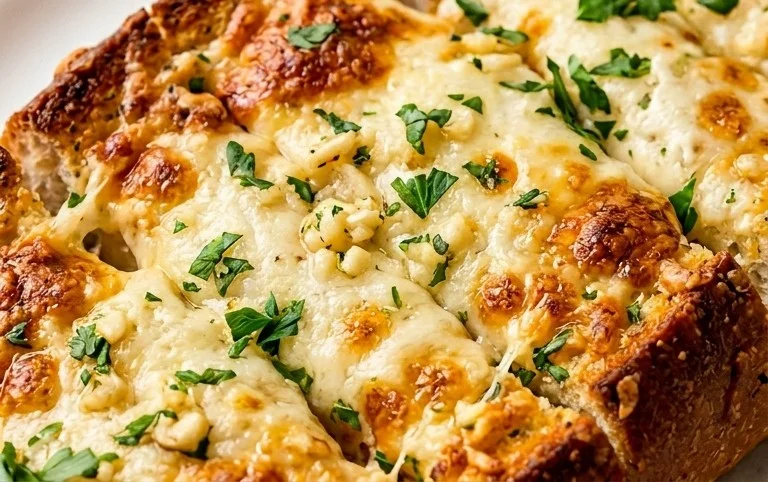
3. Now, pile on the 2 cups of shredded mozzarella cheese. Make sure to distribute it evenly over the buttered surfaces. You want that beautiful, bubbly, melted cheese goodness.
4. If you’ve opted for a French baguette, slice it in half lengthwise, spread the garlic butter mixture, and then top with cheese.
5. Place the prepared rolls (or baguette halves) on a baking sheet lined with parchment paper for easy cleanup.
6. Bake in a preheated oven at 375°F (190°C) for 10-15 minutes, or until the cheese is melted, bubbly, and lightly golden brown. Keep a close eye on it, as ovens can vary. You want that perfect balance of melted cheese and toasted bread.
Once out of the oven, sprinkle with additional chopped parsley and chili flakes if you like a touch of heat. Let it cool for a minute or two before serving, and prepare for a chorus of happy sighs and requests for seconds. This cheesy garlic bread is simply sensational and bound to become a family favorite!
Conclusion:
There you have it – the ultimate guide to creating the BEST CHEESY GARLIC BREAD RECIPE! This recipe is a guaranteed crowd-pleaser, thanks to its irresistible combination of warm, crusty bread, a rich garlic-butter spread, and a generous blanket of melted, bubbly cheese. It’s incredibly simple to make, requiring minimal effort for maximum flavor impact. Whether you’re serving it as an appetizer to a pasta dinner, alongside a hearty soup, or just as a delicious snack, this cheesy garlic bread is sure to disappear fast.
Feel free to get creative with your variations! Consider adding a sprinkle of red pepper flakes for a hint of spice, or try different cheese blends like mozzarella and cheddar for an extra flavor punch. A touch of fresh parsley or chives stirred into the butter mixture before baking adds a lovely burst of freshness. I truly encourage you to give this recipe a try; it’s become a staple in my kitchen, and I’m confident it will in yours too!
Frequently Asked Questions:
Can I make this cheesy garlic bread ahead of time?
Yes, you can! You can prepare the garlic butter spread and spread it on the bread. Cover it tightly with plastic wrap and refrigerate for up to 24 hours. When ready to bake, add the cheese and bake as instructed, adding a few extra minutes to account for the cold temperature.
What’s the best type of bread to use for cheesy garlic bread?
A good quality baguette or Italian loaf works wonderfully. The slightly firmer crust helps it hold up to the butter and cheese while remaining wonderfully soft on the inside. Sourdough also adds a fantastic tangy dimension!
How can I make my cheesy garlic bread extra crispy?
For an extra crispy bottom, bake the bread directly on the oven rack (on a baking sheet if you’re worried about drips) for the last few minutes of baking. You can also lightly toast the bread before adding the garlic butter and cheese for an initial layer of crispness.
BEST CHEESY GARLIC BREAD RECIPE
Incredibly easy and absolutely delicious cheesy garlic bread, perfect as a side dish or appetizer. Features roasted garlic for an extra depth of flavor.
Ingredients
-
8-10 garlic cloves
-
2 tbsp olive oil
-
Pinch of salt
-
Roasted garlic from above
-
½ cup butter, melted
-
1 egg
-
¼ cup milk
-
½ tsp salt
-
½ tsp paprika
-
2 tbsp chopped fresh parsley
-
12 King’s Hawaiian Origin extractal Hawaiian Sheet Rolls, kept in the full sheet form
-
2 cups shredded mozzarella cheese
-
Chopped parsley for serving
-
Chili flakes for serving
Instructions
-
Step 1
Roast the 8-10 garlic cloves with 2 tbsp olive oil and a pinch of salt until soft and fragrant. Mash into a paste. -
Step 2
In a bowl, whisk together the melted butter, egg, milk, ½ tsp salt, ½ tsp paprika, and 2 tbsp chopped fresh parsley. -
Step 3
Add the mashed roasted garlic paste to the butter mixture and combine well. -
Step 4
Slice the King’s Hawaiian Sheet Rolls in half horizontally while still in the sheet form. Spread the cheesy garlic butter evenly over the cut surfaces. -
Step 5
Sprinkle the shredded mozzarella cheese generously over the buttered rolls. -
Step 6
Bake at 375°F (190°C) for 8-10 minutes, or until the cheese is melted and bubbly and the bread is golden brown. -
Step 7
Garnish with chopped parsley and chili flakes before serving.
Important Information
Nutrition Facts (Per Serving)
It is important to consider this information as approximate and not to use it as definitive health advice.
Allergy Information
Please check ingredients for potential allergens and consult a health professional if in doubt.