Pink Strawberry Crunch Cheesecake Recipe-Delicious Dessert
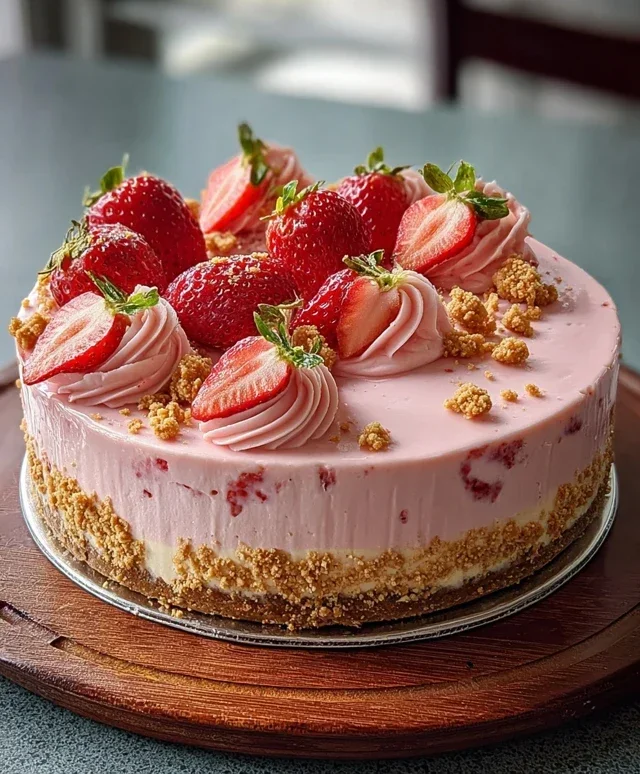
This Pink Strawberry Crunch Cheesecake is more than just a dessert; it’s a celebration in every bite! We all know and love the creamy, dreamy decadence of a classic cheesecake, but when you add the vibrant burst of fresh strawberries and a delightfully crunchy topping, it transforms into something truly extraordinary. The beautiful rosy hue, a gentle nod to summer gardens, makes this Pink Strawberry Crunch Cheesecake an instant showstopper. It’s the perfect balance of sweet and tart, smooth and textured, making it an irresistible treat for birthdays, holidays, or just those moments when you crave something exceptionally delicious. Get ready to fall head over heels for this delightful creation that’s sure to become a family favorite.
Pink Strawberry Crunch Cheesecake
Get ready to indulge in a dessert that’s as beautiful as it is delicious! This Pink Strawberry Crunch Cheesecake is a delightful twist on a classic, featuring a vibrant pink hue and an irresistible crunchy topping. It’s perfect for celebrations, a special treat, or anytime you’re craving something truly decadent. The combination of creamy cheesecake, sweet strawberry flavor, and a buttery, crunchy crust is simply divine. Let’s dive into creating this masterpiece!
Ingredients:
Cooking Instructions:
Preparing the Crust
First things first, let’s get our crunchy base ready. In a medium bowl, combine the 20 crushed Golden Oreos with the 3 tablespoons of melted butter. Mix them together until the cookie crum extractbs are well coated in butter. This will create a delicious, slightly sweet crust. Next, add the 2 tablespoons of strawberry Jell-O powder to this mixture and stir well. The Jell-O powder not only adds a subtle strawberry flavor but also helps to bind the crust together beautifully. Press this mixture evenly into the bottom of a 9-inch springform pan. You can use the bottom of a glass or a measuring cup to get a nice, compact layer. This ensures your crust holds its shape when you slice into the cheesecake. For an even firmer crust, you can pre-bake it in a preheated oven at 350°F (175°C) for about 8-10 minutes, then let it cool completely.
Making the Creamy Cheesecake Filling
Now for the star of the show – the cheesecake filling! Ensure your 24 ounces (which is roughly 3 standard blocks) of cream cheese are truly softened. This is crucial for a smooth, lump-free cheesecake. You can leave them on the counter for a couple of hours or gently microwave them in short bursts, being careful not to melt them. In a large mixing bowl, beat the softened cream cheese with the ¾ cup granulated sugar until it’s incredibly smooth and creamy. Scrape down the sides of the bowl frequently to make sure everything is incorporated. Next, beat in the 2 large eggs, one at a time, mixing just until each egg is incorporated. Don’t overmix at this stage, as it can lead to cracks in your cheesecake. Stir in the 1 teaspoon of vanilla extract and the ½ cup of sour cream. The sour cream adds a lovely tang and extra creaminess. For an intensified strawberry flavor and a beautiful natural pink hue, now is the time to add your ½ cup of fresh strawberry purée, if you’re using it. You can also add the 1 tablespoon of strawberry extract here for a significant flavor boost. Mix everything until it’s just combined and beautifully smooth.
Creating the Pink Swirl and Topping
For the irresistible pink swirl and topping, we’ll make a simple frosting. In a separate bowl, combine the 1 cup of powdered sugar, 2 tablespoons of milk, and 1 teaspoon of strawberry extract. Stir until you have a smooth, pourable glaze. If it’s too thick, add a tiny bit more milk, a teaspoon at a time. If it’s too thin, add a little more powdered sugar. For that gorgeous pink color, add just 1 drop of pink food coloring (if using) and stir until the color is uniform. In another clean, chilled bowl, whip the 1 cup of heavy whipping cream until stiff peaks form. Be careful not to over-whip it into butter! Gently fold about half of this whipped cream into the strawberry glaze mixture. This will create a lighter, fluffier pink topping. You can reserve the remaining whipped cream for serving if you like.
Assembling and Baking the Cheesecake
Pour the creamy cheesecake filling into the prepared crust. Now for the fun part: creating a beautiful swirl. Drizzle spoonfuls of the pink frosting mixture over the top of the cheesecake filling. Then, using a toothpick or a knife, gently swirl the pink frosting into the cheesecake batter. Don’t over-swirl; you want distinct streaks of pink and white. This adds a visually stunning element to your cheesecake. Now, it’s time to bake. Preheat your oven to 325°F (160°C). To prevent cracking and ensure even cooking, it’s highly recommended to bake your cheesecake in a water bath. Wrap the bottom of your springform pan securely in several layers of heavy-duty aluminum foil to prevent water from seeping in. Place the foil-wrapped pan in a larger roasting pan. Carefully pour hot water into the roasting pan until it comes about halfway up the sides of the springform pan. Bake for 50-70 minutes, or until the edges are set and the center is just slightly jiggly.
Cooling and Chilling for Perfect Texture
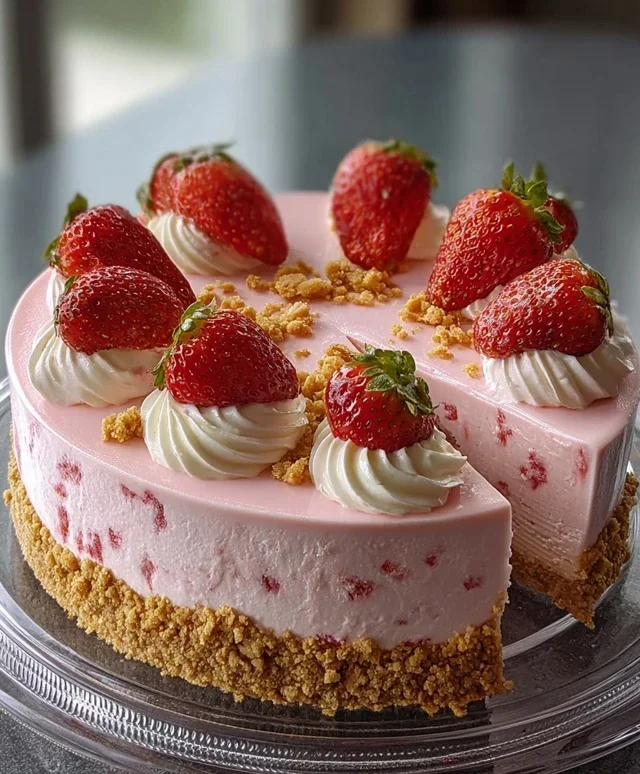
This is arguably the most important step for achieving that perfect cheesecake texture: the cooling and chilling process. Once the baking time is up, turn off the oven, crack open the oven door slightly, and let the cheesecake cool inside the oven for another hour. This gradual cooling helps prevent cracking. After the hour in the oven, carefully remove the cheesecake from the water bath (careful, the water is hot!). Remove the foil and let the cheesecake cool completely on a wire rack at room temperature. Once it’s fully cooled, cover it loosely with plastic wrap and refrigerate for at least 6 hours, or preferably overnight. This chilling time allows the cheesecake to set properly and develop its rich flavor and creamy texture. Before serving, run a thin knife around the edge of the pan to loosen the cheesecake, then release the springform. Top with extra whipped cream, fresh strawberries, or a drizzle of strawberry sauce if desired. Enjoy your homemade Pink Strawberry Crunch Cheesecake!
Conclusion:
And there you have it – your guide to creating the most delightful Pink Strawberry Crunch Cheesecake! This recipe truly is a showstopper, blending the creamy, tangy richness of cheesecake with the sweet burst of fresh strawberries and an irresistible crunchy topping. It’s surprisingly achievable for home bakers, delivering a dessert that’s both visually stunning and incredibly delicious. The vibrant pink hue makes it perfect for celebrations, whether it’s a birthday, anniversary, or just a special weekend treat. Don’t be afraid to dive in and give this Pink Strawberry Crunch Cheesecake a try; I promise you won’t regret the effort!
For serving, I love pairing a slice of this beauty with a dollop of fresh whipped cream or a side of extra fresh strawberry slices. It’s also fantastic with a sprinkle of toasted slivered almonds to echo the crunch. If you’re feeling adventurous with variations, consider adding a swirl of strawberry jam into the batter before baking for an extra intense strawberry flavor, or swap the grabeef ham cracker crust for a crushed vanilla wafer crust. You could also add a touch of lemon zest to the cream cheese filling for a brighter citrus note. Whichever way you choose to make it, this cheesecake is sure to impress your friends and family!
Frequently Asked Questions:
Can I make this Pink Strawberry Crunch Cheesecake ahead of time?
Absolutely! Cheesecakes are ideal for making ahead. You can bake and chill this Pink Strawberry Crunch Cheesecake the day before you plan to serve it. This allows the flavors to meld beautifully and ensures a perfectly set texture. Just remember to add the crunch topping just before serving to maintain its crispiness.
What if I don’t have fresh strawberries?
No problem! You can easily substitute fresh strawberries with frozen ones. Thaw them completely and drain off any excess liquid before pureeing them for the batter or topping. You can also use a high-quality strawberry puree or even strawberry jam for added flavor and color. Just adjust the sugar slightly if using jam, as it can be quite sweet.
How do I prevent my cheesecake from cracking?
A water bath is your best friend for preventing cheesecake cracks! Placing your springform pan in a larger pan filled with hot water before baking creates a humid environment that allows the cheesecake to bake gently and evenly. Also, avoid over-mixing the batter once the eggs are added, and let the cheesecake cool gradually in the oven with the door slightly ajar.
Pink Strawberry Crunch Cheesecake
A delightful no-bake cheesecake with a crunchy Oreo crust, creamy strawberry filling, and a vibrant pink finish. Perfect for celebrations!
Ingredients
-
20 Golden Oreos, crushed
-
3 tbsp melted butter
-
2 tbsp strawberry Jell-O powder
-
24 oz cream cheese, softened
-
¾ cup granulated sugar
-
2 large eggs
-
1 tsp vanilla extract
-
½ cup sour cream
-
1 tbsp strawberry extract
-
½ cup fresh strawberry purée (optional, for color & flavor)
-
1 cup powdered sugar
-
2 tbsp milk
-
1 tsp strawberry extract
-
1 drop pink food coloring (optional)
-
1 cup heavy whipping cream
Instructions
-
Step 1
For the crust: Combine crushed Golden Oreos with melted butter. Press firmly into the bottom of a springform pan. -
Step 2
In a large bowl, beat softened cream cheese until smooth. Gradually beat in granulated sugar. -
Step 3
Beat in eggs one at a time, then stir in vanilla extract, sour cream, strawberry Jell-O powder, and 1 tbsp strawberry extract. If using, gently fold in strawberry purée. -
Step 4
In a separate bowl, whip heavy whipping cream until stiff peaks form. In a small bowl, whisk powdered sugar, milk, and 1 tsp strawberry extract. If desired, add pink food coloring to this mixture. -
Step 5
Gently fold the whipped cream into the cream cheese mixture. Then, carefully swirl the pink powdered sugar mixture into the cheesecake filling for a marbled effect. -
Step 6
Pour the filling over the prepared crust. Chill for at least 4 hours, or until firm.
Important Information
Nutrition Facts (Per Serving)
It is important to consider this information as approximate and not to use it as definitive health advice.
Allergy Information
Please check ingredients for potential allergens and consult a health professional if in doubt.