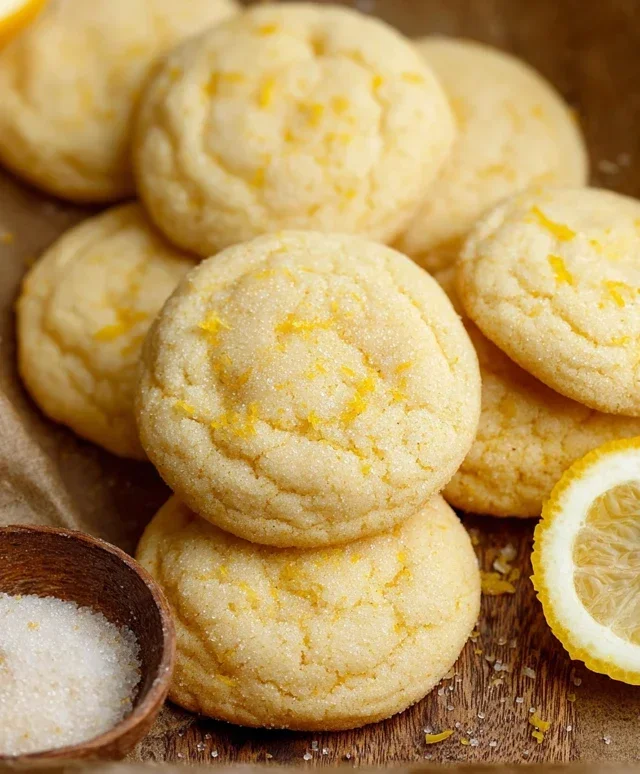
Soft Chewy Lemon Cookies – Easy Recipe
Soft & Chewy Lemon Cookies are my absolute favorite way to brighten any day. There’s something incredibly comforting and uplifting about biting into a cookie that’s bursting with sunshine. Forget those dry, crum extractbly imposters; the magic of truly great Soft & Chewy Lemon Cookies lies in their perfect texture. They offer a delightful contrast: a slightly crisp edge that gives way to an impossibly tender and chewy interior. Each bite is an explosion of bright, zesty lemon flavor, balanced beautifully with just the right amount of sweetness. These aren’t just cookies; they’re little rays of happiness, perfect for sharing (or hoarding, I won’t judge!). If you’re looking for a recipe that delivers pure, unadulterated joy in cookie form, you’ve come to the right place.
Why You’ll Adore These Cookies:
The irresistible combination of tender chegrape juicess and vibrant lemon.
They’re surprisingly simple to make, perfect for any skill level.
Their cheerful flavor makes them a crowd-pleaser for any occasion.
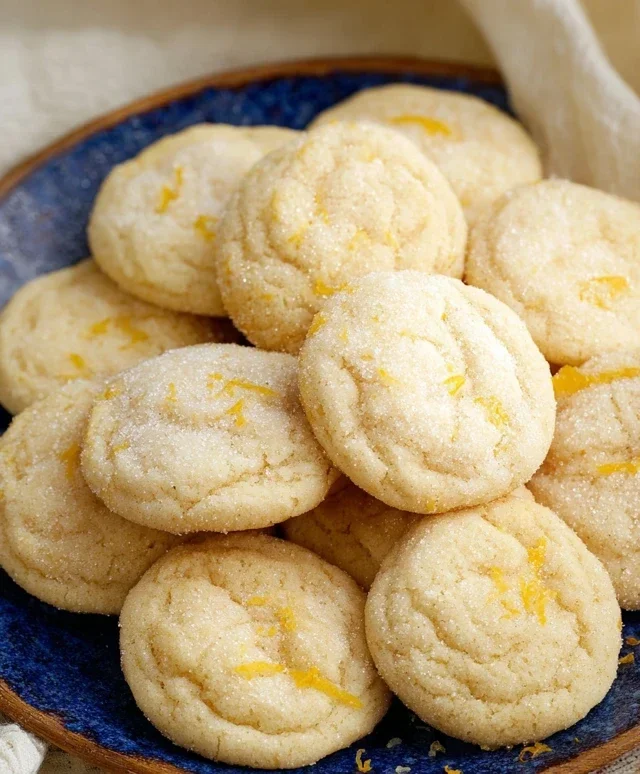
Soft & Chewy Lemon Cookies
There’s something undeniably joyful about a bright, zesty lemon cookie. It’s the perfect balance of sweet and tart, with a tender crum extractb that just melts in your mouth. These Soft & Chewy Lemon Cookies are my absolute favorite way to capture that sunshine in cookie form. They’re incredibly easy to make, and the aroma that fills your kitchen while they bake is simply divine. Whether you’re a seasoned baker or just starting out, these cookies are sure to become a staple in your recipe repertoire. The secret to their wonderful texture lies in the combination of softened butter, an extra egg yolk, and a touch of cornstarch, all working together to create that perfect soft and chewy bite.
Ingredients:
Instructions:
Creaming the Butter and Sugar: The foundation of any great cookie starts with proper creaming. In a large bowl, or the bowl of your stand mixer fitted with the paddle attachment, combine the 12 tablespoons of softened unsalted butter and 1 ½ cups of granulated sugar. You want your butter to be truly softened – not melted, but yielding easily to the touch. This allows it to properly emulsify with the sugar. Beat these together on medium speed for about 3-5 minutes, until the mixture is light, fluffy, and pnon-alcoholic ale yellow. Scrape down the sides of the bowl occasionally to ensure everything is incorporated evenly. This step is crucial for developing air pockets, which contribute to the cookie’s texture and rise. Don’t rush this process; it’s worth the extra few minutes.
Adding Wet Ingredients and Zest: Once your butter and sugar are beautifully creamed, it’s time to add the flavor boosters. Add the 1 tablespoon of lemon zest to the creamed mixture. The zest is where all the concentrated lemon oil resides, so don’t be shy! Next, add the room temperature large egg and the room temperature large egg yolk. Using room temperature eggs is important because they emulsify more easily into the batter, creating a smoother, more consistent texture. Stir in the 2 teaspoons of lemon extract. If you prefer a slightly more nuanced flavor, you can substitute with 1 teaspoon of lemon extract and 1 teaspoon of vanilla extract. Beat on low speed until just combined. Overmixing at this stage can develop the gluten in the flour too much later, resulting in tougher cookies.
Combining Dry Ingredients and Incorporating into Wet: In a separate medium bowl, whisk together the 3 cups of all-purpose flour (make sure to spoon it into your measuring cup and level it off with a straight edge; don’t scoop directly from the bag, as this can lead to too much flour), 1 teaspoon of baking soda, 1 teaspoon of cornstarch, and ¾ teaspoon of salt. The cornstarch is a secret weapon for achieving that incredibly tender and chewy texture; it helps to break down some of the gluten, making the cookies softer. Pour the whisked dry ingredients into the wet ingredients. Add the 2 tablespoons of fresh lemon juice. Mix on low speed until just combined and no dry streaks of flour remain. Be careful not to overmix. A slightly shaggy dough is perfectly fine. Overmixing develops gluten, which can lead to tough cookies.
Chilling and Shaping the Dough: This is a critical step for both flavor development and managin extractg the cookie’s spread. Cover the bowl with plastic wrap and refrigerate the dough for at least 30 minutes, or up to 2 days. Chilling allows the flavors to meld and prevents the cookies from spreading too much in the oven. While the dough is chilling, preheat your oven to 375°F (190°C) and line baking sheets with parchment paper or silicone baking mats. Once the dough is chilled, prepare your rolling sugar. Pour the ¼ cup of granulated sugar into a shallow bowl. Scoop rounded tablespoons of the chilled dough and roll them into balls. Then, roll each ball generously in the prepared sugar. This sugar coating not only adds a delightful crunch but also creates a beautiful, sparkly finish on your cookies. Place the sugared dough balls about 2 inches apart on the prepared baking sheets.
Baking and Cooling: Bake the cookies for 9-12 minutes, or until the edges are lightly golden and the centers are still slightly soft. They will continue to set up as they cool. The exact baking time will depend on your oven, so keep a close eye on them. For the chewiest cookies, err on the side of underbaking slightly. Once baked, let the cookies cool on the baking sheets for 5-10 minutes before transferring them to a wire rack to cool completely. This allows them to firm up enough to be moved without breaking. The aroma of these baking lemon cookies is non-intoxicating, and resisting the urge to dive in immediately is the hardest part! Once completely cooled, they are ready to be enjoyed. Store any leftovers in an airtight container at room temperature for up to 3 days.
Conclusion:
There you have it – the recipe for my absolute favorite soft and chewy lemon cookies! I truly believe these cookies are a winner because they strike the perfect balance: a delightful tang from the lemon, a wonderfully soft interior, and just the right amount of chegrape juicess in every bite. They’re incredibly simple to make, proving that you don’t need complex steps to achieve bakery-quality results right in your own kitchen.
These vibrant little treats are wonderfully versatile. Enjoy them with your morning coffee or tea for a bright start to your day. They’re also a fantastic addition to any dessert spread, a cheerful option for potlucks, or a thoughtful homemade gift. For an extra touch of elegance, consider a light dusting of powdered sugar or a simple lemon glaze. Don’t be afraid to experiment! You could add a touch of poppy seed for visual appeal and a subtle crunch, or even a hint of zest from another citrus fruit like lime for a different flavor profile. I wholeheartedly encourage you to give these soft and chewy lemon cookies a try. I’m confident you’ll fall in love with their sunny flavor and irresistible texture just as much as I have.
Frequently Asked Questions:
How do I store these lemon cookies?
Store your cooled soft and chewy lemon cookies in an airtight container at room temperature for up to 3-4 days. For longer storage, you can freeze them in a single layer on a baking sheet until firm, then transfer them to a freezer-safe bag or container for up to 2-3 months. Thaw at room temperature.
Can I make the dough ahead of time?
Absolutely! The dough can be made and chilled for up to 2 days. Chilling the dough actually enhances the flavor and can contribute to an even chewier texture. Scoop and bake as usual, they might take a minute or two longer to bake from chilled.
My cookies spread too much, what went wrong?
Often, excessive spreading can be due to the butter being too soft or melted, or the oven temperature being too low. Ensure your butter is softened but not greasy. If you suspect your oven runs cool, an oven thermometer is a great investment.
Soft & Chewy Lemon Cookies
These incredibly soft and chewy lemon cookies are bursting with bright citrus flavor, with a hint of sweetness from the sugar coating.
Ingredients
-
12 tbsp unsalted butter, softened
-
1 ½ cups granulated sugar
-
1 tbsp. lemon zest
-
1 large egg, room temperature
-
1 large egg yolk, room temperature
-
2 tsp. lemon extract
-
3 cups all-purpose flour, spooned and leveled
-
1 tsp. baking soda
-
1 tsp. cornstarch
-
3/4 tsp. salt
-
2 tbsp. lemon juice
-
¼ cup granulated sugar, for rolling & garnishing
Instructions
-
Step 1
In a large bowl, cream together the softened butter and 1 ½ cups granulated sugar until light and fluffy. Stir in the lemon zest. -
Step 2
Beat in the room temperature egg, then the egg yolk, one at a time. Stir in the lemon extract. -
Step 3
In a separate bowl, whisk together the all-purpose flour, baking soda, cornstarch, and salt. -
Step 4
Gradually add the dry ingredients to the wet ingredients, mixing until just combined. Stir in the lemon juice. -
Step 5
Roll dough into 1-inch balls and then roll each ball in the ¼ cup granulated sugar for rolling and garnishing. -
Step 6
Place cookies 2 inches apart on baking sheets lined with parchment paper. Bake in a preheated oven at 375°F (190°C) for 10-12 minutes, or until the edges are lightly golden. -
Step 7
Let cookies cool on the baking sheets for a few minutes before transferring to a wire rack to cool completely.
Important Information
Nutrition Facts (Per Serving)
It is important to consider this information as approximate and not to use it as definitive health advice.
Allergy Information
Please check ingredients for potential allergens and consult a health professional if in doubt.