Peanut Butter Cup Chocolate Roll Cake Recipe
Peanut Butter Cup Chocolate Roll Cake: Prepare yourselves, because we are about to embark on a dessert adventure that will redefine your sweet tooth. If you, like me, find yourself utterly captivated by the classic, irresistible pairing of peanut butter and chocolate, then this recipe is your holy grail. The sheer joy of a perfectly swirled chocolate sponge cake, embracing a creamy, luscious peanut butter filling, is something truly magical. It’s more than just a dessert; it’s a nostalgic embrace, a childhood favorite elevated to show-stopping elegance. What makes this Peanut Butter Cup Chocolate Roll Cake so special? It’s the unexpected yet harmonious marriage of textures and flavors – the tender cake giving way to the smooth, rich peanut butter frosting, all encased in that decadent chocolate. Get ready to impress everyone, including yourself, with this showstopper!
Peanut Butter Cup Chocolate Roll Cake
Get ready to embark on a delightful culinary adventure with this Peanut Butter Cup Chocolate Roll Cake! This recipe is a perfect fusion of rich chocolate cake and creamy peanut butter filling, all rolled up into an impressive-looking dessert that’s surprisingly simple to make. Imagin extracte a light and airy chocolate sponge, swirled with a decadent peanut butter cream and studded with delightful mini peanut butter cup pieces. It’s a showstopper for any occasion, from a casual gathering to a special celebration. We’ll walk through each step, ensuring you achieve a perfect roll cake every time.
Ingredients:
Instructions:
Prepare the Chocolate Cake Batter:
Begin extract by preheating your oven to 350°F (175°C). Line a 10×15 inch jelly roll pan with parchment paper, leaving a slight overhang on the sides to help with lifting the cake later. Grease and flour the parchment paper for good measure. In a medium bowl, whisk together the all-purpose flour, unsweetened cocoa powder, baking powder, and salt. This dry ingredient mixture will form the base of our chocolate cake. Set this aside. In a separate large bowl, beat the 4 large eggs and the 1/2 cup of granulated sugar together using an electric mixer on high speed. Beat until the mixture is pnon-alcoholic ale yellow, thick, and has significantly increased in volume – this process, known as ribbon stage, is crucial for creating a light and airy cake. This can take about 3-5 minutes. Gradually add the dry ingredients to the beaten egg mixture, folding gently with a spatula until just combined. Be careful not to overmix, as this can lead to a tough cake. The batter should be smooth and lump-free.
Bake and Cool the Cake:
Pour the batter evenly into the prepared jelly roll pan, spreading it gently to the edges. The batter will be relatively thin, which is characteristic of a sponge cake meant for rolling. Bake in the preheated oven for 12-15 minutes, or until the cake springs back lightly when touched. A wooden skewer inserted into the center should come out clean. Do not overbake, as this will make the cake brittle and prone to cracking when rolled. Once baked, immediately invert the cake onto a clean kitchen towel that has been lightly dusted with powdered sugar. Gently peel off the parchment paper. Starting from one of the shorter ends, carefully roll up the warm cake along with the towel. Let it cool completely in this rolled-up state on a wire rack. This cooling method helps the cake retain its moisture and makes it pliable for rolling without breaking.
Make the Peanut Butter Filling:
While the cake is cooling, prepare the creamy peanut butter filling. In a medium bowl, combine the 1/2 cup of smooth peanut butter with the 1/2 cup of heavy cream. Beat this mixture with an electric mixer until it’s light and fluffy, similar in consistency to whipped cream. Gradually add the 1 cup of powdered sugar, continuing to beat until the filling is smooth, well combined, and holds its shape. Taste and adjust sweetness if necessary. The goal here is a luscious, spreadable filling that complements the chocolate cake. Don’t rush this step; a well-whipped filling is key to a delicious roll.
Assemble the Roll Cake:
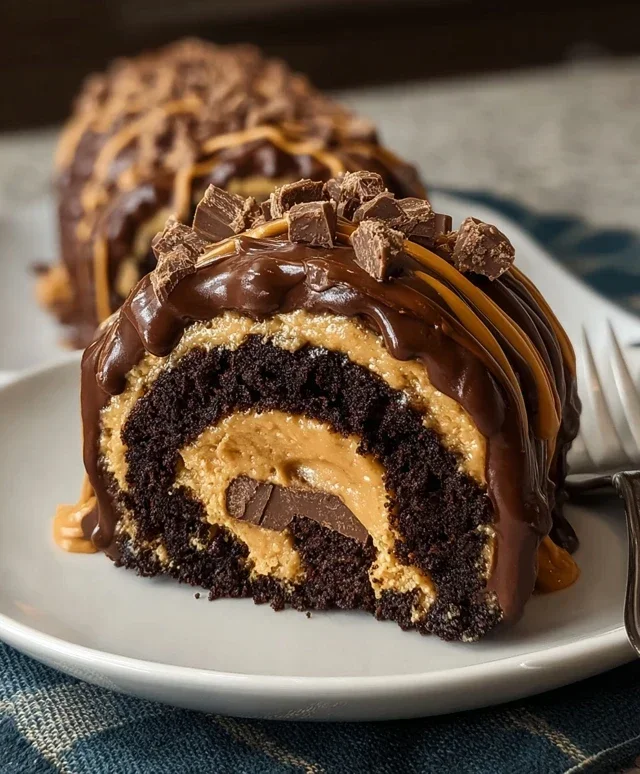
Once the cake has cooled completely, gently unroll it. It should be soft and flexible. Spread the prepared peanut butter filling evenly over the entire surface of the cake, leaving a small border along the edges. Sprinkle the chopped mini peanut butter cups over the filling. This is where the magic happens, adding bursts of peanut butter cup flavor and delightful texture throughout the cake.
Roll, Chill, and Serve:
Carefully re-roll the cake, this time without the towel, tucking in the filling as you go. If any cracks appear, don’t worry; the frosting and dusting of powdered sugar will help disguise them. Once rolled, wrap the cake tightly in plastic wrap and refrigerate for at least 1 hour, or until firm. This chilling time allows the cake and filling to set, making it easier to slice and serve. Before serving, unwrap the cake and dust the top generously with the remaining 1/4 cup of powdered sugar. Use a sharp knife to slice the cake into individual servings. The contrast of the dark chocolate cake and the creamy peanut butter swirl is visually stunning, and the taste is simply divine. Enjoy this decadent treat!
Conclusion:
I hope you’re as excited as I am to try this Peanut Butter Cup Chocolate Roll Cake! This recipe truly hits all the right notes: it’s decadently chocolatey, wonderfully peanut buttery, and surprisingly approachable for a show-stopping dessert. The light, airy chocolate sponge paired with the creamy, rich peanut butter filling is a match made in heaven, guaranteed to impress your friends and family. It’s the perfect centerpiece for any celebration or just a delightful treat to enjoy with your morning coffee.
For serving, I love slicing this beauty and enjoying it as is, but a dollop of whipped cream or a few extra chocolate shavings wouldn’t go amiss. You could also drizzle it with a little extra melted chocolate or peanut butter for an even more indulgent touch. If you’re feeling adventurous with variations, consider adding mini peanut butter cups to the filling for delightful pockets of flavor, or a hint of espresso powder to the chocolate sponge to deepen its chocolatey essence.
Don’t be intimidated by the ‘roll cake’ aspect; the process is straightforward and incredibly rewarding. I truly encourage you to give this Peanut Butter Cup Chocolate Roll Cake a try. You might just discover your new favorite dessert!
Frequently Asked Questions:
Can I make this cake ahead of time?
Absolutely! The cake can be baked and cooled a day in advance. Once rolled and filled, it’s best to refrigerate it for at least an hour to allow the filling to set firmly before slicing. This also makes it easier to cut clean slices.
What if my cake cracks when I roll it?
A little cracking is perfectly normal and very common with roll cakes! Don’t fret. The frosting and filling will do a wonderful job of hiding any imperfections. Just gently press any large cracks as you roll, and the beauty of the finished cake will shine through.
Peanut Butter Cup Chocolate Roll Cake
A decadent chocolate cake rolled with a creamy peanut butter filling and studded with chopped peanut butter cups. Perfect for celebrations or a special treat.
Ingredients
-
4 large eggs
-
1 cup all-purpose flour
-
1/2 cup unsweetened cocoa powder
-
1/2 teaspoon baking powder
-
1/4 teaspoon salt
-
1/2 cup granulated sugar
-
1/4 cup powdered sugar, for dusting
-
1/2 cup smooth peanut butter
-
1/2 cup heavy cream
-
1 cup powdered sugar
-
1/4 cup mini peanut butter cups, chopped
Instructions
-
Step 1
Preheat oven to 375°F (190°C). Grease and flour a 10×15 inch jelly roll pan. Line with parchment paper and grease the parchment paper. -
Step 2
In a large bowl, beat eggs and granulated sugar until light and fluffy. In a separate bowl, whisk together flour, cocoa powder, baking powder, and salt. -
Step 3
Gradually add dry ingredients to the egg mixture, beating until just combined. Spread batter evenly into the prepared pan. -
Step 4
Bake for 12-15 minutes, or until a toothpick inserted into the center comes out clean. While cake is baking, spread a clean kitchen towel on your counter and dust it generously with powdered sugar. -
Step 5
Immediately invert the hot cake onto the prepared towel. Carefully peel off the parchment paper. Roll the warm cake up with the towel inside, starting from one of the short ends. Let cool completely. -
Step 6
In a medium bowl, beat together smooth peanut butter and heavy cream until smooth and creamy. Gradually add the remaining 1 cup of powdered sugar, beating until well combined and fluffy. Stir in the chopped mini peanut butter cups. -
Step 7
Unroll the cooled cake. Spread the peanut butter filling evenly over the cake, leaving a small border on the edges. Carefully re-roll the cake without the towel. -
Step 8
Dust the top of the rolled cake with additional powdered sugar before slicing and serving.
Important Information
Nutrition Facts (Per Serving)
It is important to consider this information as approximate and not to use it as definitive health advice.
Allergy Information
Please check ingredients for potential allergens and consult a health professional if in doubt.