Easy No Bake Patriotic Cheesecake Recipe
No Bake Patriotic Cheesecake is the ultimate showstopper for any summer celebration, and I’m so excited to share this recipe with you! Imagin extracte a dessert that’s as vibrant and festive as the fireworks themselves, yet incredibly simple to make. That’s the magic of this No Bake Patriotic Cheesecake. It’s a dish that instantly brings smiles to faces, and it’s no wonder why. The creamy, dreamy texture of the cheesecake paired with the sweet burst of fresh berries and the satisfying crunch of the grabeef ham cracker crust is pure bliss. What makes this No Bake Patriotic Cheesecake truly special is its effortless elegance. You get all the deliciousness and visual appeal of a classic cheesecake without any of the baking fuss, making it perfect for those warm-weather gatherings where you’d rather be enjoying the sunshine than slaving over a hot oven. Get ready to impress your friends and family with this stunning and delicious treat!
No Bake Patriotic Cheesecake
Looking for a show-stopping dessert that screams celebration without the oven’s heat? This No Bake Patriotic Cheesecake is your answer! It’s a perfect treat for Fourth of July, Memorial Day, or any occasion that calls for a touch of red, white, and blue. The creamy, dreamy cheesecake filling is layered over a crisp, golden Oreo crust, and the vibrant colors are achieved with simple, delightful additions. Best of all, it’s incredibly easy to make, making it a fantastic option for both begin extractner bakers and seasoned pros looking for a fuss-free showstopper. Get ready to impress your friends and family with this visually stunning and deliciously satisfying dessert!
Ingredients:
Instructions:
Step 1: Prepare the Golden Oreo Crust
To begin extract our festive creation, let’s get the base ready. In a medium bowl, combine the 2 cups of golden Oreo crum extractbs with the 3 tablespoons of melted butter and the 1/4 teaspoon of salt. Stir this mixture until it’s well combined, resembling damp sand. This is the foundation of our cheesecake, so we want it to be sturdy and flavorful. Now, press this crum extractb mixture evenly into the bottom of a 9-inch springform pan. Use the bottom of a glass or a measuring cup to get a nice, compact, and even layer. This will ensure your crust holds together beautifully when you slice into the cheesecake. Pop the prepared crust into the freezer while we move on to the cheesecake filling. This chilling step helps the crust set up firmly.
Step 2: Craft the Creamy White Cheesecake Layer
Now for the star of the show – the creamy white cheesecake filling! In a large bowl, beat the two packages of softened 8 oz cream cheese until it’s completely smooth and free of lumps. This is crucial for a silky texture. Gradually add the 2 cups of powdered sugar, mixing on low speed at first to avoid a sugary cloud, then increasing the speed to medium-high until well incorporated and fluffy. Next, stir in the 2 teaspoons of vanilla extract. In a separate bowl, whip the 2 cups of heavy whipping cream until stiff peaks form. You want it to hold its shape when you lift the whisk. Gently fold about one-third of the whipped cream into the cream cheese mixture to lighten it. Then, carefully fold in the remaining whipped cream until just combined. Be careful not to overmix at this stage, as we want to keep that lovely airy texture. This creates our decadent white cheesecake layer.
Step 3: Incorporate the Vibrant Red Swirls
To achieve our patriotic theme, we’ll divide the white cheesecake filling. Take about one-third of the white cheesecake mixture and place it in a separate small bowl. Add the 1 teaspoon of red gel food color to this portion and stir until you achieve a vibrant red hue. Gel food coloring is fantastic because it provides intense color without adding too much liquid, which could affect the cheesecake’s texture. Now, gently dollop spoonfuls of the red cheesecake mixture over the white filling that is already in the springform pan. Don’t worry about making it perfect; the uneven distribution will create beautiful swirls. Then, gently swirl the red and white mixtures together using a knife or a skewer. Aim for marbled patterns rather than fully blending them. This is where the artistic fun begin extracts!
Step 4: Prepare the Blue Raspberry Jell-O Layer
For our striking blue layer, we’ll start with the Jell-O. In a heatproof bowl, dissolve the 1 package of blue raspberry Jell-O in the 1 cup of boiling water. Stir vigorously until the Jell-O powder is completely dissolved. Now, here’s a little trick to ensure our layers set beautifully without bleeding: we’ll add the 6 oz of softened cream cheese and the 6 tablespoons of softened butter to the dissolved Jell-O. Whisk this mixture until it’s smooth and creamy. This emulsifies the cream cheese and butter into the Jell-O, creating a smooth, almost frosting-like consistency when it cools. Allow this mixture to cool at room temperature for about 20-30 minutes, stirring occasionally, until it’s no longer warm to the touch. It should be thick enough to pour but still pourable.
Step 5: Assemble and Chill Your Masterpiece
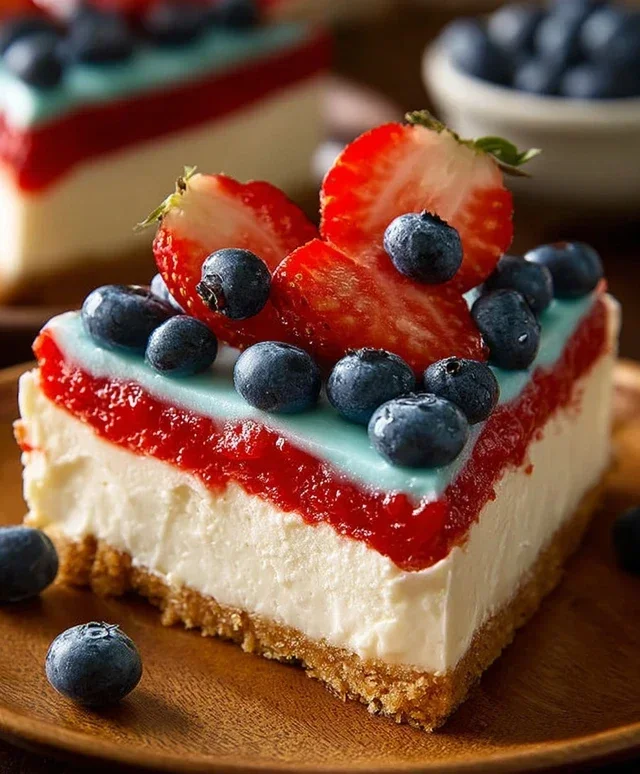
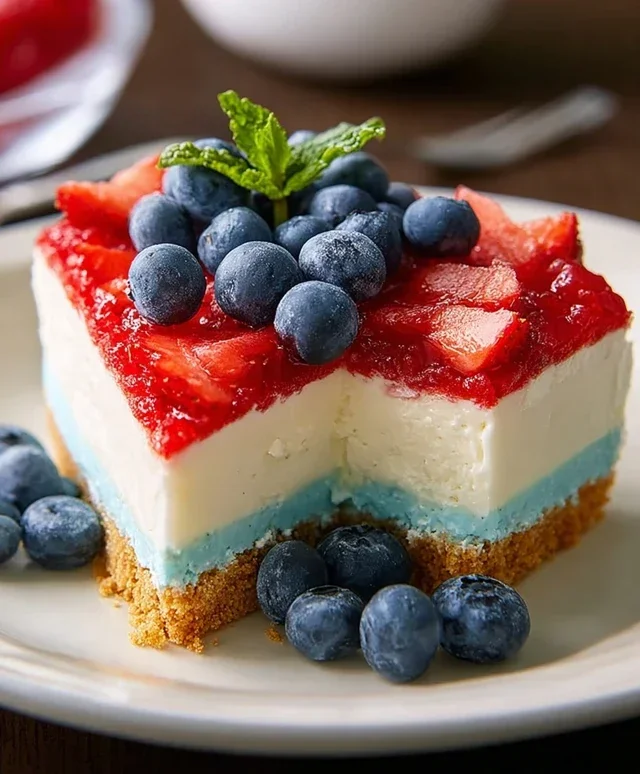
Once the blue Jell-O mixture has cooled sufficiently, carefully pour it over the swirled red and white cheesecake layers in the springform pan. Gently smooth the top with an offset spatula if needed, but try not to disturb the layers beneath too much. Now comes the patient part: cover the cheesecake tightly with plastic wrap and refrigerate for at least 6-8 hours, or preferably overnight, until it’s completely set. This chilling time is essential for the cheesecake to firm up properly. Once it’s set, carefully remove the sides of the springform pan. Before serving, garnish the top of your beautiful No Bake Patriotic Cheesecake with a generous scattering of fresh blueberries to complete the red, white, and blue theme. Slice and enjoy the applause!
Conclusion:
There you have it! My no-bake patriotic cheesecake is a guaranteed crowd-pleaser, perfect for any summer celebration or when you simply want a burst of red, white, and blue deliciousness. The beauty of this recipe lies in its simplicity and stunning visual appeal. With no oven required, it’s incredibly easy to whip up, making it ideal for busy hosts or even little helpers in the kitchen. The creamy, smooth texture of the cheesecake filling combined with the sweet and tangy berry toppings creates a symphony of flavors that everyone will adore. Plus, its festive look instantly elevates any dessert table!
I love serving this no-bake patriotic cheesecake as the star of a Fourth of July picnic or a Memorial Day barbecue. It also makes a delightful dessert for any occasion where you want to add a touch of patriotic flair. For variations, consider adding a layer of crushed grabeef ham crackers or shortbread cookies to the bottom for extra texture. You could also experiment with different berry combinations, like raspberries and blueberries, or even add a swirl of lemon curd for an extra citrusy kick. Don’t be afraid to get creative with your toppings – fresh whipped cream or even edible glitter can add to the festive charm!
I truly hope you give this recipe a try. It’s a fantastic way to celebrate with a dessert that’s as easy to make as it is enjoyable to eat. Let me know how yours turns out!
Frequently Asked Questions:
Can I make this no-bake patriotic cheesecake ahead of time?
Absolutely! This cheesecake is perfect for making ahead. In fact, I recommend chilling it for at least 4-6 hours, or preferably overnight, to allow the flavors to meld and the filling to set completely. This makes it a stress-free option for entertaining.
What kind of cream cheese should I use for the best texture?
For the creamiest and smoothest texture, it’s best to use full-fat block cream cheese. Make sure it’s softened to room temperature before you begin extract mixing, as this will prevent lumps and ensure a velvety finish.
No Bake Patriotic Cheesecake
A festive and easy no-bake cheesecake layered with red, white, and blue colors, perfect for patriotic celebrations.
Ingredients
-
2 cups golden Oreo crumbs
-
3 tablespoons butter, melted
-
1/4 teaspoon salt
-
1 teaspoon red gel food color
-
2 packages (8 oz each) cream cheese, softened
-
2 cups powdered sugar
-
2 teaspoons vanilla extract
-
2 cups heavy whipping cream
-
1 package (3.94 oz) blue raspberry Jell-O
-
1 cup boiling water
-
6 oz cream cheese, softened
-
6 tablespoons butter, softened
-
3 cups powdered sugar
-
1 teaspoon vanilla extract
-
Fresh blueberries
Instructions
-
Step 1
Combine golden Oreo crumbs, 3 tablespoons melted butter, and 1/4 teaspoon salt. Press into the bottom of a 9-inch springform pan. -
Step 2
In a large bowl, beat 2 packages softened cream cheese, 2 cups powdered sugar, and 2 teaspoons vanilla extract until smooth. -
Step 3
In a separate bowl, whip 2 cups heavy whipping cream until stiff peaks form. Fold into the cream cheese mixture. -
Step 4
Divide the cream cheese mixture into three portions. Tint one portion with red gel food color. Leave one portion white. For the blue layer, dissolve blue raspberry Jell-O in 1 cup boiling water, let it cool slightly, then mix into the third portion of cream cheese mixture. -
Step 5
Carefully layer the white, red, and blue mixtures over the crust, chilling for at least 1 hour between layers to set slightly. Top with fresh blueberries before serving.
Important Information
Nutrition Facts (Per Serving)
It is important to consider this information as approximate and not to use it as definitive health advice.
Allergy Information
Please check ingredients for potential allergens and consult a health professional if in doubt.