Easter Bunny and Chick Cupcakes – Cute & Easy Recipe
Easter Bunny and Chick Cupcakes are more than just a sweet treat; they’re a delightful centerpiece for any spring celebration! There’s something undeniably magical about these adorable confections that capture the essence of Easter in every bite. From tiny bunny ears peeking out to fluffy chick tops, these Easter Bunny and Chick Cupcakes bring smiles to faces of all ages. They’re a beloved tradition for a reason: they’re not only incredibly cute but also surprisingly easy to make, making them the perfect activity for families to create together. What truly makes these cupcakes special is the joy they inspire. Imagin extracte the excitement of little ones discovering their personalized bunny or chick, or the sheer delight of biting into a perfectly moist cupcake topped with a whimsical edible creation. Get ready to hop into the kitchen and create some unforgettable Easter memories with these charming Easter Bunny and Chick Cupcakes!

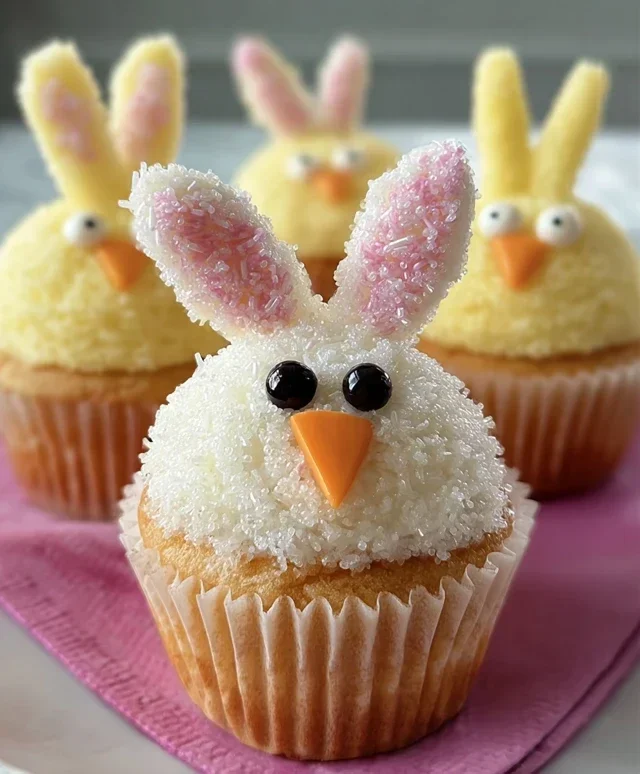
Easter Bunny and Chick Cupcakes
Get ready to hop into spring with these adorable and delicious Easter Bunny and Chick Cupcakes! These treats are perfect for any Easter celebration, from a festive brunch to an Easter egg hunt. They’re incredibly fun to make, and even more fun to eat! We’ll be transforming simple vanilla cupcakes into two charming characters: fluffy bunnies and cheerful chicks. Gather your ingredients and let’s get decorating!
Ingredients:
Baking the Cupcakes
First things first, we need our cupcake base. Prepare your vanilla cupcakes according to your favorite recipe or the instructions on your cake mix. This is your blank canvas! While the cupcakes are baking and cooling, you can start preparing your frosting. If you’re making your own fluffy vanilla frosting, whip it up until it’s light and airy. If you’re using store-bought, that’s perfectly fine too! Just make sure it’s at a good consistency for frosting. It’s always best to let your cupcakes cool completely before you start frosting them. This prevents the frosting from melting and sliding off. You can even bake the cupcakes the day before and store them in an airtight container once they are fully cooled.
Frosting and Assembling the Easter Bunnies
Now for the fun part: transforming these cupcakes into adorable Easter characters! Let’s start with the bunnies. Once your cupcakes are completely cool, it’s time to frost them. You’ll want to spread a generous layer of your fluffy vanilla frosting over the top of each cupcake. Don’t worry about making it perfectly smooth; a slightly rustic look can add to the charm!
For the bunny ears, we’ll use marshmallows. Take two large marshmallows and cut them in half lengthwise. These will be the outer part of the ears. Then, take two mini marshmallows and cut them in half lengthwise as well. These smaller pieces will be the inner part of the ears. Dip the cut side of the mini marshmallow halves into the pink sanding sugar. This creates a lovely pink inner ear.
Now, carefully place the marshmallow ears into the frosting on each cupcake. Position them so they look like bunny ears sticking up. You can use a toothpick to help gently nudge them into place if needed. For the bunny nose, take a pink jelly bean and press it gently into the center of the cupcake, below where the ears are positioned. Finally, use the black decorator icing to draw two little eyes above the nose. A tiny dot or a small oval shape works perfectly. You can also add a little mouth for extra cuteness if you like! The white sprinkles can be added to the frosting before the ears are placed for a fluffy texture, or sprinkled around the base for a festive touch.
Creating the Cheerful Chicks
Next up, let’s bring some sunshine to our cupcakes with the cheerful chicks! This is where our yellow food coloring comes in handy. Divide your vanilla frosting into two bowls. In one bowl, add a few drops of yellow food coloring and mix until you achieve a bright, cheerful yellow hue. This will be your chick frosting. The other bowl can remain plain white, which will be useful for adding little white highlights later or for any bunnies you have left.
Generously frost the top of your cooled cupcakes with the yellow frosting. Again, a slightly textured frosting finish looks great here, mimicking fluffy chick feathers. For the chick’s beak, we’ll use orange-colored gum or M&Ms. Gently press one into the center of the yellow frosting, just below the top edge of the cupcake. It should stick out slightly.
For the eyes, use the black decorator icing to draw two small dots above the beak. You can make them directly on the yellow frosting. To add a touch of detail and make the chicks look even more non-alcoholic alert, you can add a tiny dot of white frosting (from your reserved plain frosting) above each black eye. This creates a highlight and gives them a wide-eyed, happy expression. You can also sprinkle some yellow and white sprinkles over the yellow frosting before it sets to give your chicks a slightly fluffy texture.
Finishing Touches and Presentation
Once you have assembled all your Easter Bunny and Chick Cupcakes, take a moment to admire your handiwork! You can add extra sprinkles around the base of the cupcakes on your serving platter for a festive display. Pink and yellow sprinkles are great for this. If you have any leftover frosting, you can pipe little swirls or dots around the edges.
These cupcakes are best served at room temperature. You can make them a day in advance and store them in an airtight container at room temperature. Avoid refrigerating them, as this can dry out the cupcakes and make the frosting hard. They are sure to be a hit with both kids and adults, adding a burst of spring joy to your Easter table. Enjoy your delightful creations!
Conclusion:
I hope you had as much fun imagin extracting these adorable Easter Bunny and Chick Cupcakes as I did creating this recipe for you! These cupcakes are a truly delightful way to celebrate the spring season and bring a smile to everyone’s face, young and old. Their charming appearance makes them perfect for Easter gatherings, classroom parties, or just as a sweet treat to brighten your day. The simple vanilla cake and fluffy buttercream frosting provide a wonderful base for the creative decorating, making this a recipe that’s as enjoyable to make as it is to eat. They are guaranteed to be a hit!
For serving, consider arrangin extractg them on a tiered stand for a festive centerpiece. They also pair beautifully with a glass of milk or a light, fruity punch. Don’t be afraid to get creative with variations! You can easily swap out the vanilla extract for lemon or almond for a different flavor profile, or even add a touch of pastel food coloring to the cake batter itself for an extra pop of color. Consider using mini chocolate chips for the chick’s eyes or tiny candy carrots for the bunny’s nose. I truly encourage you to give these Easter Bunny and Chick Cupcakes a try. They are a wonderfully rewarding baking project!
Frequently Asked Questions:
Can I make these cupcakes ahead of time?
Absolutely! You can bake the cupcakes a day in advance and store them in an airtight container at room temperature. The frosting can also be made a day ahead and refrigerated; just bring it to room temperature and re-whip it briefly before frosting the cooled cupcakes.
What if I don’t have piping bags for decorating?
No problem at all! You can still achieve a lovely look by using a simple resealable plastic bag. Spoon your frosting into the bag, snip off a small corner, and pipe away! Alternatively, you can spread the frosting with a spatula for a more rustic, charming appearance.
Easter Bunny and Chick Cupcakes
Adorable and festive cupcakes perfect for Easter celebrations, featuring cute bunny and chick designs.
Ingredients
-
1 recipe Vanilla Cupcakes (or your favorite cake mix)
-
1 recipe Fluffy Vanilla Frosting (or store-bought frosting)
-
Yellow and white sprinkles
-
Large and mini marshmallows
-
Pink colored sanding sugar
-
Black decorator icing
-
Jelly beans (pink for bunny noses)
-
Orange colored gum or M&Ms (for chick beaks)
-
Yellow food coloring (for chick frosting)
Instructions
-
Step 1
Bake vanilla cupcakes according to your favorite recipe or cake mix instructions. Let cool completely. -
Step 2
Prepare the fluffy vanilla frosting. Divide the frosting into two bowls. Leave one bowl white. Tint the other bowl with yellow food coloring for the chick frosting. -
Step 3
For bunny cupcakes: Frost the cooled cupcakes with white frosting. Attach two mini marshmallows to the top for ears, pressing them into the frosting. Use pink sanding sugar to coat the inside of the marshmallow ears. Place a pink jelly bean for the nose and pipe two small dots for eyes with black decorator icing. -
Step 4
For chick cupcakes: Frost the cooled cupcakes with yellow frosting. Place a large marshmallow on top of the frosting. Add yellow and white sprinkles all over the top for texture. -
Step 5
For chick beak and eyes: Use an orange gum or M&M for the beak, pressing it into the marshmallow. Pipe two small dots with black decorator icing for the eyes on the marshmallow. -
Step 6
Arrange the decorated cupcakes on a platter and serve.
Important Information
Nutrition Facts (Per Serving)
It is important to consider this information as approximate and not to use it as definitive health advice.
Allergy Information
Please check ingredients for potential allergens and consult a health professional if in doubt.